Sooner or later, almost every dacha owner thinks about setting up a veranda on their own. Subject to proper construction and finishing, the extension will be an excellent addition to the main house, contributing to a significant increase in the usable area of the building.
You can handle the arrangement of the veranda on your own. Read the basic instructions and get started.

Before you start studying the guide to building a veranda at your dacha, understand the main features of this design.
Inexperienced summer residents often confuse the veranda with another popular extension known as the terrace. However, there are differences between these two extensions.
The terrace, although attached to the main house, is an open area. Sometimes it is supplemented with a small perimeter fence and a protective canopy.
The veranda is arranged in such a way that it looks like an organic continuation of the main structure. That is, at its core, the veranda is an additional room, perhaps not heated (if desired, you can install heaters).
One wall of the veranda is connected to the house, the other three walls of the extension are glazed.

What to build a veranda from?
To build a veranda, it is best to use the same materials from which it was built country house, for example, brick or foam block - focus on the specifics of your situation.
The easiest way to build extensions is from wooden beam and according to a frame scheme from ready-made elements. The presented guide will discuss the procedure for constructing a wooden veranda frame.
For finishing For the roof of the extension, you can use any convenient and affordable materials: bitumen shingles, roofing felt, polycarbonate sheets, slate, etc. It is better if the roof of the veranda is covered with the same material as the main house.
Video - Construction of a veranda
Foundation arrangement
The construction of an extension, as well as any other buildings, begins with the construction of the foundation. It is more convenient and easier if the construction of the veranda was planned at the stage of drawing up the design of the main house. In such a situation, you can arrange the base of the extension parallel to the main foundation.

However, you can also cope with arranging an extension to an already finished house without any problems.
The best base option for a veranda is a columnar structure with brick supports.
The pillars should be arranged in the places where the corner and support frame posts are located in increments of no more than 50-70 cm.
Video - How to make a columnar foundation
First step. Mark the foundation in accordance with the planned configuration of the veranda.
Second step. In the places where the supports will be placed, dig holes with a depth of 100 cm.
Third step. Place a 20 cm thick layer of sand at the bottom of each hole. Firmly compact the pillow. If your site has sandy or other problematic soil, backfill with crushed stone.
Fourth step. Pour melted bitumen over the compacted backfill. Once hardened, this material will become a reliable waterproofing material.
Fifth step. Place a layer of concrete mortar in the hole. The concrete surface must be perfectly leveled.
Sixth step. Lay a brick support on the frozen base to the required height.
Select the height so that the finished flooring of the extension is 250-300 mm below the floor of the main house. In such a situation, the roof of the veranda will be able to be “brought” under the overhang of the main roof structure, and the height of the extension will correspond to the height of full-fledged living rooms.
Seventh step. Coat the support posts with bitumen.
Eighth step. Fill the remaining empty space of the holes with crushed stone, broken bricks or other material of similar properties and size.

Construction of the frame
The veranda, as already noted, is built using wood.
Start building the frame. To build it, use a simple wooden beam with a section of 10x10 cm.
First step
Lay the bottom trim on the base of the foundation supports. To fasten the strapping beams, use a tongue-and-groove connection or other similar joining methods.

Second step
Install vertical posts. Fasten them to the bottom frame beam using staples, as well as galvanized screws and nails of suitable length. You can also use wooden dowels for connections. In such a situation, holes for their placement will need to be made in advance.


Place supporting vertical posts in the corners of the future veranda and in the places where doors and double-glazed windows are installed. If the extension will have a large area, place additional intermediate supports.
Third step
Mount the top frame beam on top of the installed racks. Use anchor bolts for fastening.

Roof structure
The optimal roofing option for a veranda is a lean-to sloping structure. Horizontal types of roofs are not very convenient - they are not able to provide effective removal of precipitation.
First step
Install the rafters onto the previously secured top frame beam. To fasten the elements, use suitable fasteners, for example, staples and screws.
At the top, the rafters are fastened using a special girder. This element is placed under the roof slope. Anchor bolts are traditionally used to secure the purlin.
Second step
Attach boards or timber (depending on the chosen finishing coating) to the rafters.
If you choose rolled material, for example, roofing felt, make a continuous sheathing from high-quality wide boards. If you plan to use sheet roofing materials, for example, polycarbonate, then the sheathing should be assembled from beams. The sheathing itself will look like a kind of frame for fixing the finishing sheets.
Third step


Proceed with installation of the finishing coating. Recommendations on the choice of material were given earlier - it is better if it is the same as the roofing material of the main structure. For the rest, focus on your preferences and available budget.

Floor installation

For flooring, it is best to use edged boards.
The order of installation of the structure is standard: first, they are attached to the lower frame frame wooden joists, and floor boards are fixed to them.
Before installation, all wooden structural elements must be impregnated with an antiseptic.
If desired, the boards can be painted, varnished, or another preferred coating can be placed on them. Do as you please.
Video - Floor on the veranda
Doors and double glazed windows

Proceed with the installation of double-glazed windows. First you need to secure the window sill boards. Usually they are fixed at a height of half a meter from the floor line. In general, it all depends on the design features and height of the windows you choose.

Quite often, the glazing is continuous, that is, from the floor line of the extension to the ceiling.
The mentioned window sill boards should be attached to the supports of the structure frame. Sew up the space between the double-glazed window and the floor with any suitable material for the event, for example, panels or clapboard.

Install the front door taking into account your individual preferences. It can be placed from any convenient part of the extension - there are no specific rules in this regard.
Finishing

If you plan to use the veranda exclusively as a summer room, the cladding can be done only on the outside, abandoning the interior decoration. If the extension will be insulated and used in cold weather, be sure to complete the interior finishing. In such a situation, insulation is laid between the layers of finishing.

Even if insulation is not part of your plans, all other things being equal, it is still better to do the internal lining. It will give the interior of the extension a more noble and finished look.
Lining is perfect for finishing surfaces. For the rest, be guided by your preferences.

Now you know how to build a veranda at your dacha yourself. This guide presented one of the simplest and most popular variations of this design. In reality, there are a huge number of different modifications of the veranda.
However, despite such diversity, the construction of all extensions is carried out approximately according to the same scheme. Having understood the main points and principles of construction work, you will be able to cope with the independent construction of a veranda without any problems.

Good luck!
Video - Do-it-yourself veranda at the dacha
Country holidays in the country are, first of all, an opportunity to breathe twenty hours a day fresh air garden or forest. It is impossible to relax and at the same time be in the stuffy box of a country house, so a summer resident who values his health sooner or later arranges with his own hands a full-fledged summer terrace with an awning or a roof. Building a terrace with your own hands is much more simpler than gazebos or a veranda, so arranging a special area for a table and garden furniture, as a rule, will not require large investments, despite the fact that the effect will be quite impressive.
What is the secret of the terrace
Despite a certain external similarity between the veranda and the terrace, the purpose of these buildings is different, as are the actual sizes and designs. A veranda is a part of a house with closed walls, windows and a full roof. The terrace is a landscaped outdoor area for relaxing on a sunny day with a canopy, canopy or awning. It’s easier to understand the difference if you look at photos or drawings of a classic terrace.

When choosing a place and method for building a terrace with your own hands, you can use classic techniques for arranging a recreation area:
- In close proximity to the house, using the platform and steps as a porch and platform in front of the entrance to the house;
- Take it out as a separate area and place it in a cozy, sunny and less windy place summer cottage. In this case, a prerequisite is the arrangement of a path, stairs or steps, with the help of which you can quickly get inside the house;
- Build a special type of roof or ceiling for your terrace with your own hands country house, on which there will be a recreation area.
Important! It is clear that verandas and gazebos are not built this way, so any drawings and recommendations for the construction of terraces can be creatively processed, changing the dimensions to suit your wishes. The main thing is that the design is comfortable, durable and safe to use.
The dimensions of terraced areas, as a rule, can be several times larger than the dimensions of gazebo buildings, and even more so, verandas. Almost always, the base of the deck is built from wood or composite, raising the structure above the ground so that moisture and dampness do not affect the condition of the boardwalk.

Selecting the device, design and dimensions
The terrace is a one-of-a-kind building, designed not to create shade, but, on the contrary, aimed at providing the possibility of a comfortable and safe stay in the sun. Therefore, when choosing a project and site for constructing a terrace with your own hands, drawings and dimensions, you must take into account the following features:
- The design of a platform of any size, raised above the ground by more than 18-20 cm, must include fencing and railings for the terrace. For buildings that include several platforms located at different heights, intermediate steps and handrails are provided;
- The floor, railings and fences must be made of wood or a material with similar properties, for example, a polymer composite. The drawing must indicate the quality of wood processing and the type of coating applied - varnish or a protective composition based on epoxy resins;
- If there is a canopy or awning, one edge of the roof must be attached to the main wall of the house, the second rests on stationary supports embedded in the ground to a depth of at least 40 cm with a concrete blind area poured.
Important! Before choosing a diagram of how to make a terrace, it is important to choose the right material that best matches the design in the drawing.
The easiest way is to build a terrace at the corner junction of two walls of the house, as in the photo. In this case, we build a terrace and automatically get a platform in front of the entrance to the house.
Corner terrace design
Most simple option terraces will be the construction of a platform made of wood on a primitive foundation of concrete blocks or slabs, as in the drawing. The angular arrangement provides protection of the terrace area from wind and rain on both sides, so there is no need to install wind protection with polycarbonate sheets or wood panels.
If necessary, you can install a fabric awning, curtain or canopy over the terrace, the dimensions of which will be limited only by the dimensions of the walls of the house. The disadvantages of the design include the fact that if the slope is incorrect, the wooden platform can affect the distribution of rainwater, therefore the calculation and size of the slope of 3-4 degrees must be immediately recorded on the terrace drawing. The size of the foundation supports for the flooring must be calculated from a sketch or drawing, based on measurements of the entrance opening above the ground level.

For a lightweight frame structure of a terraced area, it will be enough to lay 12-15 concrete blocks or several dozen clinker tiles as a foundation. You will first need to remove the top layer of soil, fill it with fine gravel, compact it and lay a sand cushion. The most difficult thing will be to maintain the size and thickness of the sand base so that the height of the foundation columnar or slab supports does not exceed the calculated value according to the drawing.

Geotextiles can be laid on the sand, which effectively prevents the growth of weeds and grass. To fill the floor of the terrace, experts recommend first tying the supports with timber and laying joists made of wood. But in this case you have to increase vertical size terraces are 20-30 cm high, which is not always convenient. In the simplest case, a beam measuring 60x60 mm is laid directly on the tile and fixed with pieces of reinforcement, driving it directly into the ground.
The most difficult stage of assembling a budget terrace structure will be covering the decking with boards. An oak or special decking board made of polypropylene and sawdust, 200x30 mm in size, is best suited.
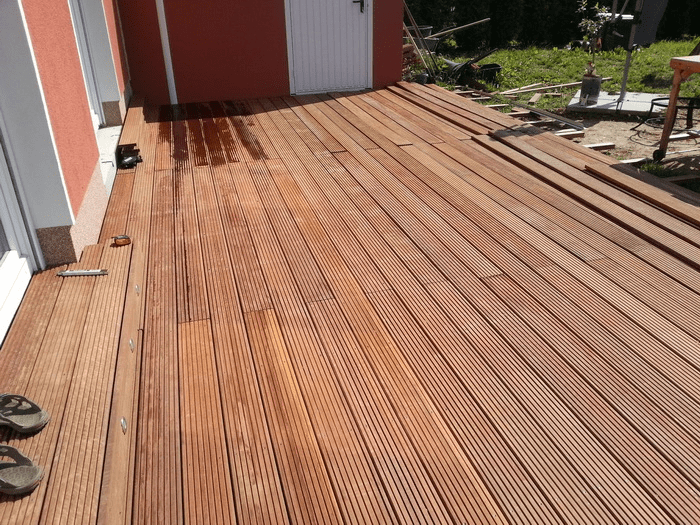
For your information! The appearance and dimensions of the composite material are practically no different from processed natural boards. High resistance to moisture and absolute insensitivity to insects and pathogenic microorganisms make decking boards an excellent substitute for expensive oak wood.
When covering the platform frame, you must carefully follow the recommendations for installing decking boards given in the drawing. In a similar way, flooring can be made from ordinary boards pre-treated with an antiseptic.
Building a simple terrace on your own
The average size of the site is 4x2 m. We will install the wooden structure on wooden supports in a swinging pattern. Part of the terrace area will rest on pillars made of paired timber 120 cm long and 100x100 mm in size, the second part of the terrace will rest on the plank wall of the country house. To install the timber, we will drill holes in the ground with a diameter of 90 mm and hammer the supports with a sledgehammer.

Next, the supports driven into the ground must be tied with a board placed flat or a sheet of thick plywood with a section size of 350x40 mm. When attaching boards, it is necessary to additionally control the horizontal position of the strapping sheet.

We attach the side trim boards directly to the walls wooden house, in the supports you will need to make a gash for installing a longitudinal strapping board.
After assembling the frame, transverse joists are installed, measuring 2.5 m with a cross-section of 100x40 mm, which will increase the rigidity of the base of the terrace platform and at the same time serve as a support for the floorboards.

At the next stage, the terrace fencing is assembled. Along the outer contour of the platform, grooves are cut out in the floorboards, after which, as in the drawing, supports are nailed under the railings. A vertical beam or board measuring 100x50 mm, 120 cm high is attached to the bottom board of the trim using self-tapping screws. A groove for the crossbars is filed on the inside of the racks, after which the lower bar and handrails for the terrace area are installed.

Diagonal spacers are placed between the posts, increasing the strength of the entire fence structure.
Conclusion
The above terrace design is simple and easy to build with your own hands. If desired, you can install a small fabric awning or a full-fledged canopy made of polycarbonate or light ondulin over the terrace area. The wooden structure must be treated with protective antiseptics, and the floor must be periodically treated with wax or paraffin mastics.
It is more convenient to build a terrace to the house together with the main building, since both structures are placed on a common foundation and brought under one roof. Nevertheless, it’s never too late to start building an extension, if you have the desire and the opportunity. Theoretical information on how to make a veranda with your own hands near a cottage or country house is described in detail in this article.
We are drawing up a terrace project
Any construction, including the construction of a veranda, begins with design. This will allow you to draw up a work plan, select materials available on the farm and purchase the necessary fasteners. To sketch a drawing of a future design by hand, you need to answer the following questions:
- determine the size and type of construction: an open summer terrace or a warm winter option;
- what construction material is supposed to be used - wood, brick or metal (they can be combined);
- where to place the porch - right in front of the entrance or on the side facade;
- think over the external design of the structure and sketch it on paper or on the computer;
- how many windows to put in an attached gazebo closed type or glaze the openings between the racks.
Log house and attached summer gazebo
Advice. When creating a construction diagram, familiarize yourself with ready-made projects and photos of verandas presented on the Internet, and take advantage of suitable ideas for decoration and exterior design.
The dimensions of the terrace depend not only on the functional purpose of the attached room; the external design plays an important role here. Against the background of a two-story country mansion of 300 square meters, a small veranda measuring 3 x 4 m will look like a leaning booth, that is, inharmonious. But if you stretch it along the length, move it to the side wall and design it to match the style of the building itself, the picture will turn out quite beautiful, as shown in the photo:

Combining a rustic extension with a modern brick cottage
To small ones country houses and change houses, it is customary to attach verandas along the entire width of the front or side facade. The solution allows you to significantly expand the usable area of your home without taking up much space on the site.

A few words about the interior of the new premises. Typically, terraces near the house are intended for relaxation or family celebrations so that the canopy can protect against sudden rain. Setting up a kitchen with a fireplace there or installing it is inappropriate and irrational, since you will have to organize an exhaust hood. For these purposes, it is better to use separate summer structures - garden barbecues with a brick grill, covered with corrugated sheets.

We bring to your attention a video that shows about 100 options for a wide variety of extensions to private houses:
Selection of building materials
You can attach a veranda to your house from various materials:
- wooden beams as a structure plus cladding with boards and clapboard;
- metal profile pipes with transparent polycarbonate or glass lining;
- silicate or ceramic brick, from which solid walls or only pillars are laid out.
For reference. There is another option for a translucent structure - a metal-plastic frame with glazing. Its disadvantage is the high price of double-glazed windows and window profiles.

A wooden terrace made with your own hands from timber is the most common budget option. Its advantage is the simplicity and low cost of construction, which lasts from 3 to 7 days (excluding the time for concrete hardening) depending on the qualifications of the contractor. The construction is lightweight and therefore does not require a major expensive foundation. The only drawback is that wood must be painted at least once every 3 years to protect it from environmental influences.
A metal frame will cost more than a wooden one, but outperforms the latter in terms of durability. Otherwise, the veranda made of profiles repeats the advantages of a wooden building: it is light, quickly erected (even without welding, bolted) and quite durable. There is an additional bonus: the construction of the foundation can be greatly simplified if the iron posts in the ground are properly concreted, as is done for fences.

Note. Construction of a terrace using frame technology from metal or wood makes it possible to use a variety of materials for finishing - lining, siding made of plastic and wood (for example, a house block imitating a log) or simple OSB plywood. A more expensive cladding option is cellular polycarbonate and glass panels.

Brickwork, although durable, is complex and labor-intensive to execute. To build a veranda from brick or foam block, you need to lay a capital strip foundation, and on heaving soils - pour a reinforced concrete slab over the entire area of the structure. These types of work require proper qualifications, so it is recommended to trust them to conscientious builders. Next, we suggest considering options for wooden and metal structures that you can implement yourself.
Preparing the base
For a light veranda attached to a house, a traditional columnar foundation is sufficient. It consists of single supports of a round or square shape, buried to a stable layer of soil and located at key points. The material of the pillars is monolithic reinforced concrete, red brick or cinder blocks. The supports are placed at the corners of the building and along the line of the walls in increments of 1.5 m, as shown in the diagram.

To lay columnar foundation, follow the step-by-step instructions:
- Remove the turf from the construction site and mark it using pegs and a cord stretched between them. The goal is to clearly determine the location of the corner and intermediate posts.
- Dig or drill holes to a stable layer of soil (usually a depth of 1 m is enough) and tamp the bottom. Pour 10-15 cm of sand there and compact it by pouring water.
- To pour reinforced concrete pillars, you need to place the formwork in the form of a wooden box or large-diameter iron pipe (300-400 mm). Lower the frame inside, connected from reinforcement of a periodic profile Ø10-16 mm.
- Fill the pillars with M150 concrete (mix 1 volume of M400 Portland cement with 3 parts of sand and add 5 parts of crushed stone). Lay the stone supports out of brick to the required height.
- After the concrete has hardened, remove the formwork and waterproof the walls of the pillars with bitumen. Fill the sinuses around them with earth.

Two tips. In order not to make a mistake with deepening the foundation, be guided by the finished foundation of a private house. The height of the above-ground part must be provided so that when laying the strapping beam and rough flooring it reaches the level of the finished floor in the existing building.
If you decide to make a frame from profile pipes, follow the same method, only instead of reinforcement, immediately lower 80 x 80 mm iron pillars into the pits, align them vertically and concrete them. To avoid formwork, protect the walls of the pits with roofing felt. How this is done in practice, watch the video:
In wet heaving soils with monolithic concrete It’s better not to get involved, since you’ll have to drill and fill too deep. Apply screw piles 2.5-3 m long, they can easily withstand the weight of a lightweight structure.

Pile-screw foundation
Building a wooden veranda
When the base for the terrace is ready, proceed to tying the supports with timber and installing floor joists. Before laying the beams on the supports, cover each of them with sheets of roofing material, and treat all wooden elements with an antiseptic. The step-by-step work order looks like this:
- Make notches at the ends of the beams to connect them into half a tree at the corners. Lay the beams, adjust them horizontally and attach them to the posts with anchor bolts.
- Install logs from 5 x 15 cm boards at intervals of 0.6 m and secure them with steel angles and galvanized screws.
- Lay the floors with 4 cm thick boards, nailing them down. Leave a gap of 1-2 mm between them so that the floors do not creak later.

Note. If you are planning to build a winter veranda, then ordinary cold floors will need to be insulated. To do this, nail skull blocks to the sides of the logs, place 20 mm second-grade boards, waterproofing film and insulation on them, and then lay the flooring.

Thermal insulation of floors
The walls can be assembled using frame technology: first, put together the facades from boards on the ground, and then set them vertically and secure them with bevels. Do not forget to provide a slope for a pitched roof, which should be adjacent to the wall of a residential building. Fasten the installed frames together, tie them to the wall of the building and proceed to installing the roof:
- Using anchors or dowels, attach a horizontal beam 10 x 15 cm to the wall of the house. It will serve as a support for the rafters.
- Above each vertical pillar of the front facade, install rafters from 5 x 15 cm boards, secure them with corners and screws.
- Cover the entire roof with sheets of diffusion membrane (waterproofing) with an overlap of 100 mm, and install a sheathing of 2 cm thick boards on top.
- Lay a suitable roofing covering - metal tiles, slate, corrugated sheets, and so on.

When the main structures are assembled, all that remains is to install the doors, glaze the windows and clad the walls on both sides. The choice of materials is huge - from plastic panels and siding to figured lining (block house). Make a porch, as described, and you can consider the construction of an open terrace complete. Each stage of work is shown in detail in the following video:
To make the veranda at your dacha cozy in winter and not let in the cold outside, take care of insulating the roof and walls. “Best friends” with wood mineral wool, lay it between the racks, sew it with a vapor barrier film and internal finishing material.
Metal extension
The procedure for installing a veranda on a metal frame is very similar to assembly wooden structures described above. The difference is that you already have vertical supports concreted into the ground. They need to be tied profile pipe 40 x 60 or 40 x 40 mm (depending on load). It is not necessary to use welding; the elements are screwed together.

Metal support unit option
As in the previous version, the racks are connected by a strapping beam at the level of the floor and ceiling, after which window and door openings are formed. If the span width does not exceed 3 m and the roof is not planned to be insulated, then use a 40 x 60 mm profile placed on edge as rafters. In other cases, it is better to take a section of 60 x 60 mm or more. The order of work is maintained, only fastening is done by welding, bolts or metal screws.
Advice. Reduce the cost of constructing a veranda by combining various building materials. Use the same as rafters wooden boards, screwed to a steel Mauerlat (top trim). How to do it correctly with your own hands is demonstrated in the latest video:
Conclusion
As you can see, there are many options for building outdoor and closed verandas. It is clear that it will not be possible to consider each of them in detail in one article. We outlined the principles of conducting work, since the sequence is repeated almost everywhere: foundation - frame - walls - roof. The difference is in the materials used and fastening methods. Exception - brickwork, requiring a more thorough approach.
Related posts:

Adding a veranda to the house is quite feasible with your own hands. The simplest option is open, when the veranda combines the functions of a porch. If a warm room is required, it is necessary to properly sheathe the veranda with boards and lay insulation.
Choosing a foundation
Depending on the weight of the extension, the type of soil and financial capabilities, the optimal type of foundation is chosen. But in any case, the foundations of the building and the veranda should not touch - an elastic gasket - mineral wool or polystyrene foam with mandatory waterproofing - is placed between them in a 10-15 centimeter gap. So, due to the difference in the weight of buildings during spring heaving, the foundations will not deform.
A columnar foundation for a veranda to a house is suitable for lightweight extensions and soils that do not require special preparation.
1. Mark the space for the pillars. The corner supports are marked first; if the distance between them is more than 1.5 meters, intermediate posts should be installed every half meter. Inside the perimeter, the supports are arranged in squares according to the same principle.
2. Holes are dug. Their depth should be below the soil freezing line or equal to the main foundation. 10 cm of sand and the same amount of gravel are poured onto the bottom, formwork is installed and everything is filled with concrete. The surface must be leveled.
3. After the concrete has completely hardened, pillars are erected from bricks. Their height should be lower than the main foundation to place a veranda canopy under the roof of the house.
Strip foundation
A warm veranda to the house, especially if the walls are planned to be brick, should be built on a strip or pile foundation. The principle of pouring it is the same, it just requires more time and materials.
The bottom of the trenches is leveled and compacted tightly, a sand and gravel cushion is placed on top and formwork is organized.

Waterproofing is installed, everything is poured with concrete and leveled. Considering that the terrace is not a permanent structure, it is not necessary to reinforce the foundation for it.
For sandy and heaving-prone soils, it is best to use a foundation on piles for heavy insulated verandas. Using screw piles, they can be screwed into the ground even without the use of special equipment.
To do this, metal piles are screwed into pre-marked places, in the upper part of which holes can be made and rods-levers can be inserted to facilitate screwing. After deepening to the required depth, the top of the piles is cut off, and they themselves are filled with concrete.

For a warm terrace with your own hands, it is better to choose simple drawings, otherwise, without the necessary skills, a complex structure cannot be built correctly. A rectangular veranda with a pitched roof is the best option.

The bottom trim is made double and laid on the foundation and connected “half-tree” in the corners. Vertical posts are attached to the bottom frame, and their height is selected depending on the location - near the wall of the house they are higher to ensure the slope of the canopy. After this, the top trim is made and the crossbars for the window frames are attached.

A purlin is attached to the wall of the house - a horizontal beam on which the roof of the veranda will rest. The rafters are laid with one end on the purlin and the other on the opposite side top trim. The lathing is attached horizontally across the rafters.
For soft tiles, plywood is laid on the sheathing, and metal tiles can be attached directly to the sheathing. It is important not to forget about hydro- and thermal insulation if the extension is planned to be warm.

How to make a veranda, correctly mount the frame and attach the mounting board is explained very clearly in the video:
By building a veranda, you can make your home more beautiful and unique, as well as expand its usable area. But how to build it? The easiest way is to add a veranda to the housing project before construction begins - in this case, it will have a common foundation with the house and will be stronger.
However, if such an opportunity was missed, do not be upset, since it is absolutely possible to attach a veranda to the house after its construction is completed - you just need to study the technology of work and learn all the intricacies of the process. How to build a veranda correctly?
Veranda design
The first stage of any construction is the creation of a project; This stage is also important when constructing such a relatively simple structure as a terrace. You can draw up a detailed construction plan yourself using various software. However, if you don't have special education, it is better to contact the design office for professional help.
Plan of walls and partitions of the first floor
Design can be divided into several separate stages.
Choosing a veranda type
A veranda attached to the house can have the most different type. All such structures can be divided into two types:

You can choose any option - the main thing is that the terrace fits organically into the overall exterior of the house and becomes its logical continuation.
Thematic material:
The form of construction also varies. The simplest and most affordable option is a regular rectangular veranda. A rounded, curved design will be more complex. You can also add polygonal terraces to the house, running along one or several walls or even forming a whole belt around the entire house. It is not at all necessary to build a veranda around front door, although this seems to be the most obvious solution.
Material selection
As a rule, the veranda is built from the same material from which the house is made: it is better to attach a veranda made of logs or timber to a brick building or a wooden house. However, you should not rely on design compliance alone. Another important criterion when working is how difficult the construction of the veranda will be.

It is the easiest thing to build - an object made from it can be easily processed, the material allows you to easily implement many design ideas. You can also simply and inexpensively create a structure from modern materials: WPC, PVC, polycarbonate. To attach a concrete or metal veranda to a house, you will most likely need the help of specialists in various fields.
Construction site analysis
One of the most important tasks when designing a terrace is studying the technical nuances and bringing the characteristics of the future building into line with the conditions of the area. Several factors will affect the quality and durability of the structure:
- soil type;
- the condition of the building wall to which the veranda is planned to be attached;
- climatic conditions in the region.
The maximum mass of the terrace, the complexity of the foundation, the need for insulation, and much more depend on these parameters.
Receiving documents
This point is very easy to lose sight of if all the work on building a terrace from start to finish is done independently. The veranda design and other technical documentation will help you obtain permission to change the design and technical certificate of the house. By law, construction approval is required by the following authorities:
- local government;
- fire safety authorities;
- sanitary and epidemiological station.
It seems that since the built house and land are your property, you are free to do whatever you want with them - including adding a terrace. However, without all the permits and a documented project, the terrace will be legally considered an illegal extension to the house. This will make it impossible to sell the object, donate it, or exchange it; It will also be impossible to get a bank loan using the house as collateral.
Construction of the foundation
Once the project is completed and all permits have been obtained, the actual construction work can begin. And their first part is the construction of a high-quality and reliable foundation. How to do this part of the building correctly?

The main requirement is this: the base of a closed or open veranda attached to a private house must correspond in its technical specifications the foundation of the main building. First of all, its depth should be the same. If this requirement is not met, when the air temperature drops due to uneven deformation of materials, parts of the house will separate, and a gap will appear between the terrace and the wall.
The new foundation is connected to the old one in different ways depending on how long ago the house was built.
- A new house is usually in the process of shrinking, so a rigid connection will lead to the destruction of a less durable structure - most likely it will be a terrace. In this case, the veranda is built using the tongue-and-groove method - it will slide around the house as if on rails, and the difference in shrinkage rates will not harm the structure in any way.
- If the house has been standing for a long time and the shrinkage has completed, a rigid connection of the terrace to it is allowed. In this case, a gasket made of waterproofing material (for example, roofing felt) is used and the joint is treated with polyurethane foam.
It will not be possible to make the foundation unified if the terrace was not conceived at the design stage of the house, but nevertheless, you should try to combine the bases of the veranda and the house as efficiently as possible.
The type of foundation is selected depending on the design features of the terrace, primarily its mass, as well as the type of soil.

Formation of flooring
Whether the planned veranda is closed or its main attribute is complete openness, in any case, the floor of the terrace must be durable, warm and protected from destruction.
Most often, even if the rest of the veranda is made of concrete or brick, the floor is made of wood. This is due to both the practical and aesthetic properties of this material:
- wood prevents heat from escaping into the ground;
- it is durable;
- wood is completely safe for health;
- such a floor practically does not require decorative treatment, since the material itself is very beautiful - you just need to cover it with a layer of varnish to protect it from damage.
The floor on the finished foundation is built in the following order.

All wooden elements of the veranda must be treated with antiseptic and antibacterial impregnations. This will protect the terrace floor from rotting, damage by fungi and other microorganisms, significantly extending its service life.
Walling
Walls, unlike the floor, are an optional attribute of attached verandas. Instead of them, it is quite possible to build a regular one. The veranda may not have any fencing at all - some projects for adding a veranda to the house involve the use of plants and hedges as a fence. If you plan to make full-fledged railings, walls and roofing, the next stage after the formation of the floor will be the construction of the frame.
A lightweight wooden frame is made like this.
- Along the perimeter of the floor, beams are laid, connected to each other with a direct lock. Grooves should be made on them for attaching the racks in increments of about 50 cm.
- The racks are fixed in the grooves using metal brackets.
- The racks are tied with timber on top.
- We make rafters for the roof.
A lightweight metal frame is erected in a similar way. If the foundation allows, the frame can be made of concrete or brick. The thickness of the load-bearing structural elements may differ from the characteristics of the walls of the main house. Roof supports must be at least 1.5 bricks thick, fence posts must be 125 mm thick.

Terrace walls can be finished using a variety of materials:
- wooden or plastic lining;
- metal siding;
- beam;
- decorative brick and much more.
The main thing is compliance and appearance Houses.
The walls of the veranda must be connected to the wall of the house in the same way as the foundations of the structures. For this purpose, steel embedded elements are used. They are fixed in the main wall using deep holes, and in the wall structures of the terrace they are laid at the construction stage and secured with cement-sand mortar.
If the veranda is made open, railings are erected instead of walls. They can also be made from wood, metal, WPC, brick or concrete. This type of fence consists of posts, balusters and railings.
Roofing works
The roof of the terrace can be removable, but it is better to securely fasten it to the frame if you plan to build a durable veranda. Like the floor, the main part of the roof is made of wood. The reliability and durability of the structure depend on how accurately the construction technology is followed.
The main terrace is rafter system, consisting of wooden beams and sheathing of boards. The purpose of this system is to hold the roofing material in place and withstand external influences - for example, precipitation pressure. Therefore, a lot depends on the quality of the rafters.
First of all, the rafters are treated with antiseptic agents. Next, the following work is done.

After all the main elements of the veranda have been completed, all that remains is to make a few finishing touches - to do interior decoration, carry out electrical wiring and, if necessary, heating, install recreational furniture.
The listed construction work is only the basic part of the technology that any veranda extension requires. The remaining elements - stairs, decorative elements - are made in accordance with the project. Having built the main parts of the terrace, you can probably easily cope with the additional ones.
Order services from professionals
Don't have time to build yourself? Contact the following organizations.