- PC greenhouse
- What happens in the greenhouse?
- How to build a greenhouse?
- Frames and structures
- Video: mini-greenhouse from a barrel
A greenhouse is a predecessor and simplified seasonal analogue of a greenhouse. The design of greenhouses varies greatly, from those that do not require anything other than a covering film, to structures about which you can’t really tell by looking whether they are still a greenhouse or a greenhouse. Having made a greenhouse with your own hands, you can first supply your family with early/late vegetables and herbs and at the same time master the intricacies of greenhouse farming, without risking losing a lot of initial investments due to mistakes due to inexperience. And if things work out, then build a real all-season greenhouse and get plant delicacies on the table all year round; It is possible to establish a profitable business.
PC greenhouse
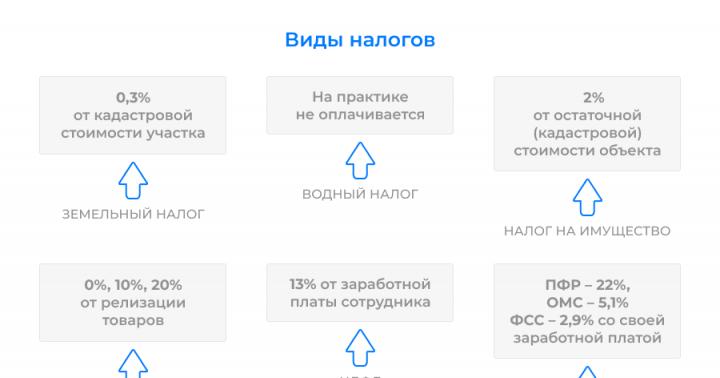
Currently, light-transmitting greenhouse coverings are made almost exclusively from polycarbonate (PC). This material was developed for this purpose and only later did its advantages become apparent in the construction of gazebos, canopies, porch covers, swimming pools, etc. However, To build a homemade polycarbonate greenhouse you need to take into account the following circumstances:
- PC is sold only in solid sheets from 2x6 to 2x12 m; it is not cut into pieces.
- Cost per 1 sq. m of the cheapest PC structure 2R with a thickness of 4 mm is less than that of glass, and is comparable to the cost of agrofilm, see below for more information.
- Without quite expensive complete accessories (standard fasteners with thermal compensators, edging profiles, aluminum tape, filter tape for the ends), a PC will last no more than 3-4 years outdoors.
- PC installation is most often carried out with pre-stressing due to bending of the sheets. This gives the structure greater strength, but requires a reinforced (and, accordingly, more expensive) frame of a special design; see e.g. about the construction of greenhouses.
Based on this, it is recommended to make a greenhouse under polycarbonate either with scraps remaining, for example, from a gazebo, or using a solid flat sheet in a fairly rigid frame, see below. It’s better to design your first greenhouse with film, especially since there are options for which you won’t need anything other than it.
What happens in the greenhouse?
A greenhouse with the plants in it and the soil in which they are planted is a fairly delicate biosystem. Its main difference from natural ones is the forced change of biorhythms for the sake of faster development/ripening and greater productivity of greenhouse crops. From a biological point of view, a greenhouse is not a greenhouse at all; in that biorhythms are close to natural, only intensified. Therefore, this section outlines the basic information necessary to properly make a greenhouse.
Plants
The biorhythm of plants in a greenhouse generally corresponds to the natural one, see Fig. on the right, but with some differences that speed up their “maturing”, see below.
In the light:
- Vegetative parts - leaves, green stems - absorb carbon dioxide and water from the soil with minerals dissolved in it;
- Metabolic oxygen is released. Respiratory oxygen is absorbed as always, but much more metabolic oxygen is released;
- As a result of photosynthesis, dissolved organic, so-called, are formed. plastic, substances necessary for the growth and development of a plant;
- Plastic substances partially enter storage (tubers, bulbs, rhizomes, non-chlorophyll parts of stems) and generative (flowers, ripening fruits) organs, and are partially deposited in the so-called. depot - special cells or cellular structures of the vegetative parts.
At night or in the dark:
- Vegetative parts and roots absorb oxygen for respiration and release carbon dioxide;
- Green leaves, in addition, release excess water in the form of water vapor through stomata or, less commonly, in the form of droplets through water stomata - hydathodes;
- The depots of plastic substances are emptied, using up the daily supply;
- Plastic substances also reach the roots, ensuring their growth. The roots grow mainly at night.
Conclusion #1: during the day, when it is warm enough outside to ensure at least minimal plant life, the greenhouse needs to be ventilated. Plants consume little oxygen for respiration, but there should still be enough oxygen for the night, otherwise rot and disease will occur. It is advisable to ventilate before noon, when the sun is warm, so that the nighttime excess CO2 and H2O will immediately disappear.
Greenhouse effect
The covering of greenhouses is made of materials that transmit visible light well, but reflect, directly or diffusely (scatteredly), thermal (infrared, IR) rays as best as possible. So the greenhouse effect in greenhouses is different from what everyone hears in the earth’s atmosphere, see Fig.

During the day:
- Part visible light used by plants for photosynthesis;
- The other share is absorbed by molecules of greenhouse gases - carbon dioxide and water vapor - transferring them to a higher energy level;
- Another part of the light is absorbed by the soil, which immediately re-radiates it into IR, warming the air and the structure of the greenhouse;
- Part of the IR from the soil is reflected from the coating (on the left in the figure, for simplicity, only 1 branch is shown) and ultimately also heats the soil, the air and the structure. IR practically does not interact with greenhouse gas molecules;
- The soil temperature is sufficient for root activity, but may be lower than that outside, directly heated by the Sun.
Note: CO2 molecules, which are heavier than air, are concentrated mainly in the lower part of the greenhouse, and H2O, which are lighter, are concentrated under the roof.
At night:
The structure and drawings of a Russian greenhouse are shown in Fig. There were usually 3-4 greenhouse pits, which ensured year-round use: while 1 pit was warming up after refilling, the rest were producing products. An indispensable condition for the successful operation of a Russian greenhouse is the lining of the entire complex of pits with a clay castle with a drainage ditch, otherwise the biofuel will sour.

Note: Instead of log sheds, it is now possible to install concrete lintels for windows and doors, trellis posts for grapes, etc. Instead of glass, insert PC into the frames; this will allow you to raise the northern edge 35-40 cm above the ground and grow tomatoes. And instead of silver-plated mirrors, use any flat panels covered with aluminum foil for baking. The soil above the biofuel is poured No. 1.
Pos. 3 – film tunnel on a collapsible frame. For beginning farmers, this is certainly the best greenhouse:
- Simple and cheap, requires virtually no construction/carpentry work; see below about "Snowdrop".
- Keeps enough overnight fresh air for plant respiration.
- A large volume of air in the shelter gives a strong greenhouse effect, which makes it possible to build cold greenhouse tunnels, ready for action immediately after the snow melts.
- Allows you to grow fairly tall crops, up to long-fruited cucumbers.
- It is easily transferred to another place, and the possibilities of land turnover are limited only by the available sown area.
About "Snowdrop"
The film-tunnel type greenhouse of industrial production "Snowdrop" is probably the most popular in the Russian Federation and the CIS, and for good reason: purchasing components at retail for a homemade analogue can be more expensive than purchasing a ready-made kit. Just in case, in Fig. A diagram of its design and installation is shown.

Greenhouse "Snowdrop"
Please note that:
- The advantages of “Snowdrop” appear only when covered with agro-film;
- If you bend arcs from water pipes of a standard length of 6 m, the span will be 1.9 m, and the height under the ridge will be 0.8 m;
- The arches can be connected to the ridge beam by tying them crosswise with flexible wire or wrapping them with agro-scotch tape.

Pos. 4 – cassette greenhouse or box greenhouse. It is done exclusively for seedlings in soil or in bulk, because completely depletes the soil in 1-3 months. Another drawback - poor use of light - can be eliminated with an agrofibre coating. But in 1 sq. m cassette, you can grow seedlings for 12 or even 20 acres.
Pos. 5 – greenhouse-house or butterfly. These are made either removable with established land turnover (see above), or for intensively breathing crops: tomatoes, eggplants, vegetable (sweet) peppers, because film without a frame quickly deteriorates from frequent lifting and refilling.
Note: Vegetable peppers from the nightshade family are not related to real peppers from the capsicum family. So named because of some similarity in the shape of the fruit.

Bulk greenhouses, pos. 6 and 7, are most often built stationary on a durable frame. The coating is appropriately durable, agrofibre or PC. Soil drainage is required; visible in pos. 6. In addition to the butterfly, other design options are possible, see below.
About greenhouses for cucumbers

Recently, in private farms, ordinary garden cucumbers with recumbent vines are increasingly being replaced by long-fruited greenhouse cucumbers: they require less land, they are high-yielding and never taste bitter right down to the bottom. However, the culture of long-fruited cucumbers in open ground in most of the territory of the Russian Federation it is impossible without shelter; they are heat-loving and do not tolerate frost, so they are cultivated in greenhouses.
The greenhouse for cucumbers must, firstly, be high enough: the “long-fruited” vines grow more than 1.5 m in height before they can be planted horizontally, see fig. Secondly, greenhouse cucumbers do not like to “steam”; this causes powdery mildew and other cucumber ailments to develop on them. Therefore, the roof of the cucumber greenhouse must be flat so that the cool night-time steam cushion from under it evaporates through the cracks. In addition, under flat roof attach horizontal rods; cords hang down from them, to which the cucumbers cling with their mustaches.

As a result, the greenhouse for cucumbers turns out to be approximately the same as in Fig. top right. However, less labor-intensive options of the tunnel type on pointed arches are also possible, see below.
About the orientation of the greenhouse
Ridges of soil greenhouses run along a north-south line. Tunnels, cassettes and butterflies are oriented in the same way. As for pits and lean-to structures (see below), they are oriented with the slope to the south or south-southeast, because Plants work most actively in the morning, using the night's excess CO2.
Frames and structures
Materials
Wood rots quite quickly in a greenhouse, so the wood for building a greenhouse must be treated with environmentally friendly, i.e. purchased with a certificate, water-repellent compounds - water repellents. Popular for sheds, outbuildings, gazebos, garden benches And for country furniture, gratuitous processing is not suitable: additives introduced into motor oil should not get into food.
Note: in the manufacture of a greenhouse frame from scrap materials wooden structures you need to disassemble and impregnate the parts separately. At the same time, you’ll go through the process of replacing unusable fasteners to make it stronger.
It is better to make stationary greenhouses on a frame made of plastic pipes; they will ensure strength, durability and environmental friendliness. We'll come back to them later, but for now let's see what we can do in a hurry.
Anything from
A ready-made, and quite good, translucent coating is provided by window frames. The greenhouse is small, so you can get by with 1-2-3 windows. However, unlike a greenhouse, it does not have high transparent walls, so it is better to make a greenhouse from old window frames with a single slope oriented to the south, on the left and in the center in Fig. The second circumstance is that no matter what frames you have at your disposal, the transparent roof must be made folding (lifting upward), and not hinged or folding, as on the right in Fig. Through any vertical gap, all the warm air will instantly evaporate and the plants will be hit with cold, and the horizontal one can be adjusted with supports according to the weather and local conditions.

Note: optimal slope of the roof slope of a lean-to greenhouse from the vertical (90 degrees) –?, where? – geographical latitude of the place; and (90 degrees)–? – angular altitude of the Sun at noon of the spring/autumn equinox. See below about a greenhouse with a heat accumulator.

A successful simple greenhouse; more precisely, its frame made from industrial wood waste is shown in Fig. Its highlight is visible in Fig. the slope of the ridge beam to the south is approximately 10 degrees. This gives, firstly, best use Sveta. Secondly, the entrance should be made from the north side in the form of a vertical slot in the canopy with fasteners or Velcro. Then, by slightly opening the slit, we get effective ventilation, and there is no need to raise/lower the film on the sides. The struts are also installed correctly, from the west, and the eastern slope is flatter.
Very good material greenhouse coverings – polyethylene terephthalate, PET. As you know, bottles and other containers are made from it. You will need relatively few bottles for a greenhouse, so it is better to use them whole, stringing them into “kebabs” on “skewers” made of a steel rod. How to do this (the technology is simple) is described in the article on greenhouses.

As for the design, the best greenhouse from plastic bottles– a folding bed, or a greenhouse-book, see fig. left. Shields made from PET bottles are excellent light concentrators and reflect IR well; You only need to cover the openings with film at night and in anticipation of frost. And during the day the plants will be warm enough, plus free gas exchange is ensured.
For a long time on the frame
A durable greenhouse is usually built on a frame made of plastic pipes. This frame is strong and lightweight; 1-2 people carry it without covering, assembled, if the greenhouse is mobile. The frame is placed on the ground by placing the ends of the pipes on pins driven into the ground; driving depth - from 40 cm. The formwork under the bulk soil is attached to the pipes with clamps.
Pipes for the frame are PVC or propylene water pipes. The former are cheaper and last in the frame for up to 10 years. However, arcs from PVC pipes can only be bent semi-circular or, to increase the height by reducing the span, parabolic, pos. 1 in Fig.

PVC is quite plastic and not particularly durable, and the ridge of the roof is most loaded. If the PVC pipes are connected at a kink here, the fastening will not last long.
The strongest, most durable, and gives the most choice of construction options, is a frame made of polypropylene pipes. From them you can assemble pointed arches, pos. 2 in Fig. And their use, in turn, provides the following advantages:
- With a simple tap right angle and using self-tapping screws (item 1 in the figure below), the arches can be made collapsible into corners and long parts that require little space for winter storage.

- From 3 m sections (halves of a standard 6-m pipe) an arch is obtained with a span of more than 1.7 m and a height of under 2 m, pos. 2. That is, you can enter the greenhouse like you would into a greenhouse.
- The pointed arch ensures high light utilization because... there is no flat strip of roof covering giving a large tangential (lateral) reflection. But on the slopes of the arch there is always a wide strip, which gives optimal refraction at any position of the Sun.
- The high elasticity of PP makes pointed arches pre-stressed, i.e. increased strength. This makes it possible to use prestressed PC for the coating, as for greenhouses.
- A ridge beam made from the same pipe is secured from the inside with clamps, tying with wire or agro-adhesive tape, also pos. 2.
- In general, the frame is very durable and resistant to loads from precipitation: there is nowhere for snow piles and rain flows to linger.
- The high altitude not only makes it easier to care for plants, but also allows you to grow long-fruited cucumbers simply on stamens in combination with other crops, pos. 3, or low-growing valuable varieties of the same cucumbers, for example. gherkins, pos. 4.
About PC coatings
In some regions, depending on local prices, polycarbonate coating may be cheaper than agrofiber for a greenhouse of the same area. In such a case, in Fig. – installation of a sub-fence/wall-mounted greenhouse under a PC for tomatoes:

There is 1 whole sheet for the roof; no special fasteners are required. The height and width are given taking into account PC waste for processing and fastening. Where higher, tall varieties are planted, for example. pink, regular in the middle, and small but very tasty (and expensive on the market) cherry tomatoes at the bottom. The height and width are given approximately for the latitude of St. Petersburg based on summer. To the south, the height can be taken equal to the width, and vice versa.
However, PC is more suitable for covering “long-lasting” greenhouses on a steel frame with flaps. In this class, the usual butterflies, pose. 1 on next Fig., are gradually being replaced by greenhouses, pos. 2. A greenhouse-breadbox is better than a butterfly not only and not so much in its greater ease of care. In it, in any position of the valves under the arch, a cushion of warm greenhouse gases is retained for quite a long time, which greatly reduces the likelihood of plants getting cold when ventilated.

Planning a purchase or self-production greenhouse-breadbox, you need to know about its weak points. The first is a hinge with fixation of the sashes. This is a technologically quite complex unit that requires precise manufacturing of parts while maintaining the resistance of the entire hinge to contamination. The second is the joint of the sashes. A gap of 2-3 mm is enough for the warm pillow not to stick, so the gap at the joint should be of a minimum width and sealed.

Bread bins, as you know, come not only with flaps. At pos. Figure 3 shows a greenhouse-breadbox in the form of a chest. He holds the pillow under the arch in the same way, but for home craftsmen and craftsmen his design is preferable, because does not require special care in manufacturing. Therefore, on to the next. rice. drawings are given a simple greenhouse breadbox-chest.
Breadbox for the North
According to the scheme of another type of household bread bin, a greenhouse with a heat accumulator for a particularly harsh climate can be built. It is suitable only for potted and container culture, but in places with soddy-podzolic or tundra-gley soils, anything else is impossible. Unlike a heat-accumulating greenhouse with lighting in the dark, here the air circulation is semi-closed, for which the heat accumulator itself (ruble stone, broken brick) is placed in a cage made of steel rods, raised above the floor of the greenhouse, see fig. During the day, the lid is opened slightly, the flow of fresh air provides ventilation. The plants do not get cold, because... cold air immediately mixes with warm air heated by the Sun through the lid. The battery gains heat and releases it at night when the lid is closed.

The inclination of the cover from the vertical is equal to the angular height of the Sun at noon of the equinox, pos. And where? – geographical latitude of the place. There is no need to make a heat storage device from seemingly quite suitable solid hollow red brick. As can be seen in pos. B, there will be no horizontal air circulation in such a storage tank, it will warm up unevenly and at night the cold part will take the heat for itself, but the plants will not get it.
The traditional design of a mini-greenhouse replicates that of a mini-greenhouse. But a modern mini-greenhouse is already different: it is either a light spatial frame, covered with PET or EVA, for flowers or a small number of seedlings, or an individual umbrella greenhouse for elite garden specimens, see fig.

Both designs can be easily reproduced at home: a three-dimensional frame can be made from scraps of metal-plastic pipes, fastened with agro- or ordinary tape, and an umbrella can be made from any rigid rod and fiberglass rod ends or pieces of elastic steel wire, for example. bicycle spokes In any case, it is better to dissolve PET bottles into sheets for coating.

Easier than steamed turnips...
...which can also be grown in a greenhouse. Finally, we will give options for greenhouses, as they say, out of nothing and for nothing. In Fig. on the right is a mini-greenhouse made from a barrel. How to make it, see the video.
Video: mini-greenhouse from a barrel
The other is a fully-fledged tunnel greenhouse with all its advantages... with only the cost of film, plus a little bit of cord. Do you think it's impossible? Watch the following video:
Video: cheap DIY greenhouse
1. Greenhouse-house

From window frames you can build charming houses that will not only provide comfort to plants, but will also become a stunning decoration for your summer cottage.
2. Dome

A large polygonal greenhouse, the frame of which is built of wood covered with ordinary oilcloth. Despite the complexity of manufacturing, this dome-shaped design is attractive appearance, stability and excellent illumination.
3. Plastic cap

A mini greenhouse that can be made from a regular plastic bottle by simply cutting off the bottom. Such a greenhouse is best suited for cucumbers and zucchini, as these plants do not tolerate transplantation well and spend a lot of effort on adaptation. At the beginning of planting, the cap should be covered with a lid; later, when the daytime temperature reaches twenty degrees, the lid should be removed, and later the bottle should be removed altogether.
4. Caskets

From four boards and window frame you can make an original small greenhouse for flowers and plants. At first, the lid of the window frame should be kept closed, and when the plants grow and become stronger, fold it back.
5. Foldable design

A convenient, practical folding greenhouse that can be made from small-diameter PVC pipes and regular polyethylene.
6. Umbrella

A small greenhouse made from a wooden barrel and an old oilcloth umbrella or the frame of an ordinary umbrella covered with polyethylene.
7. Cozy tent

A greenhouse tent, which can be built from a children's tent, equipping its walls with inserts made of oilcloth or polyethylene, or you can buy a ready-made film greenhouse tent. The advantages of this design are its compactness and mobility.
8. Plastic house

Plastic bottles can make a wonderful open or open greenhouse. closed type. Creating such a greenhouse will not require large expenses or special skills, and you determine the size and design of the structure yourself.
9. Lifting cover

An original greenhouse with a lifting lid, made from wooden planks, thin PVC pipes, polyethylene and metal chains. This design is quite simple to construct and very convenient to use.
10. Flowerbed

A small greenhouse, to create which you will need a wooden frame of the desired size, two thin plastic pipes and a piece of oilcloth. The beauty of this design is that when the plants get stronger and the night temperature rises, the oilcloth can be easily removed and thereby turn the greenhouse into a neat flower bed.
11. Mini house

An adorable greenhouse made from plastic CD boxes is perfect for growing indoor plants and will become a magnificent decoration for the balcony.
12. Pallets

A small greenhouse can be easily built from old pallets and plastic film. This greenhouse is perfect for growing seedlings or indoor flowers.
13. Container

An ordinary plastic container will make an excellent greenhouse, which is suitable for growing seedlings on the balcony.
14. Reliable boxing
Large greenhouse made of wood and polycarbonate.
A large and reliable greenhouse made of polycarbonate attached to a wooden frame, which, despite the difficulties of construction and some capital investments, is perfect for growing any crops and will last for many years.
Continuing the topic, to the attention of readers for proper disposal.
Everyone loves useful And delicious vegetables grown on your own plot of land or in your country house. Not all plants can survive summer in open ground. To preserve the harvest, many summer residents use special structures called greenhouses or greenhouses.
The option for constructing such a structure depends on the needs, financial capabilities and size of the site. Functionality And design features greenhouses and greenhouses are practically no different, because they are intended for growing vegetables and seedlings. The only difference between these structures is size.
Greenhouses are fairly large buildings that are installed permanently on a foundation. Vegetables can be grown in greenhouses all year round if a special heating system is installed there.
Greenhouse– a reduced copy of the greenhouse. This design is usually used for early planting of seedlings and growing vegetables in summer in cold regions of the country.


 The design features of building a greenhouse at the dacha with your own hands are simple and easy to install. Their varieties are usually determined by the type of material used and the ability to move.
There are greenhouses stationary And portable type.
- Stationary ones are usually made in the shape of a butterfly with doors opening on both sides.
- Portable greenhouses are usually made in the form of a tunnel or arch. The material for such greenhouses is standard polymer film.
In turn, greenhouse options can be very different:
- The “Dutch” greenhouse has everything in common with a free-standing structure, but its walls are thicker closer to the ground to concentrate heat.
- Detached building with gable roof, where glass frames are used as roofing material.
- The simplest and most cost-effective option is to make a greenhouse in the form of a tunnel. The material for it is film, most often used in the country.
- A wall-mounted structure, which, to save heat, is closely adjacent to the house with one wall. The disadvantage of this design is the lack of natural light.
- A do-it-yourself arched greenhouse is a difficult structure to build. It involves a single arched roof and wall system. Experts note that when choosing an arched greenhouse, you must carefully familiarize yourself with the features of the frame and covering material before purchasing or independently constructing the structure.
- A small greenhouse, built with your own hands, is ideal for a small dacha. This structure is made a continuation of the main building and is equipped with a pitched roof.
- The polygonal design of a do-it-yourself metal greenhouse has a rather aesthetic appearance, but it is not economical to operate.
- A dome-shaped greenhouse is an ideal structure for receiving sunlight.
How to make a greenhouse from arcs with covering material
DIY construction
 When choosing a location for a greenhouse, it is more correct to take into account factors that may affect the quality and quantity of the harvest. It is better to place the greenhouse in an open space away from other buildings on the site and large trees.
If the area of the land is small, then you can build a greenhouse with one side adjoining the wall of an existing building, for example, a house or barn. In this case especially an important condition it will become necessary to build the remaining sides of the greenhouse on the south side of the site to obtain maximum quantity sun rays.
Material selection
 Material for a simple greenhouse with your own hands must meet the following requirements:
- Easy to install.
- Good sunlight transmission.
- The cost of the material and its installation.
- The magnitude of the load of the structure on the soil.
- Resistance to soil movements, temperature changes and various deformations.
- Duration of operation.
Glass is rightfully considered the most durable material, but its installation requires a fairly strong foundation and an expensive frame. And the most budget option would be polymer film, which you can choose based on quality and characteristics.
Greenhouse construction
 Laying the foundation required only for a stationary greenhouse structure for products made of polycarbonate or glass.
To do this, before starting work, the fertile layer of soil is removed, the rest is thoroughly compacted.
The ideal option for the foundation of a greenhouse is the so-called tape-reinforced type, the depth of which is 25 centimeters or more.
4-5 days after pouring the foundation, you can begin installing the frame. This is an integral part of every greenhouse, for this reason its integrity and quality must be given maximum attention. Usually the frame is made of wood, plastic or metal profile.
Creating a “butterfly” greenhouse from polycarbonate with your own hands
How to make a greenhouse
 The wooden frame is an environmentally friendly and easy-to-install material. But the tree does not cope well with temperature changes and changing climatic conditions.
In order for such a frame to last longer, it must be treated with wood preservatives once a year.
The metal frame has increased wear resistance and can withstand heavy loads. The main thing is to protect such a frame from the effects of corrosion. This is a more labor-intensive process of making a greenhouse, for which you will need a special welding machine and an angle grinder.
To build a lightweight mobile greenhouse with your own hands, plastic pipes that are light weight, flexible and affordable are suitable. To connect, you will need fittings and a special soldering iron.
Covering the structure
 After making a solid frame for a greenhouse or greenhouse, you can begin installing walls and roofing using the selected material.
The film is the easiest to install and affordable option for covering a greenhouse with your own hands. When choosing such a coating, you need to adhere to simple rules:
- Do not cut the film in advance. It is necessary to cover the entire structure with it, leaving small gaps, and only then cut it off.
- Avoid mechanical damage to the material by using a special stapler or wooden planks for fastening.
- Carry out work in calm weather and average temperatures.
- When glazing a greenhouse, the material from which the frame is made is important.
If the frame is made of wood, then the roof glazing is carried out along grooves with special grooves for collecting and draining condensate. It is better to make fastening material from dry wooden blocks and pre-prime them with drying oil.
When laying glass on a metal frame, the only difference is the fastening material - metal fasteners. Otherwise, the installation is no different; the glass is laid on putty and secured with staples.
How to choose a quality shade net for plants in a greenhouse
Polycarbonate is used to cover the frame on the side where the pattern is located. Sections of sheets of material are sealed with a special tape for sealing along the top and perforated at the bottom. This material is attached to the frame using a specialized profile and rubber gaskets in order from the roof to the sides.
The construction of a floor in a greenhouse is done for greater convenience and aesthetic appearance. A high-quality floor retains heat in a building for a long time. Best option Arrangement of the floor in the greenhouse is sand or crushed stone.
The most expensive option would be to install heated floors in a greenhouse. This requires additional preparation and supply of electricity to the greenhouse, but this solves the problem of heating it in winter.
Ventilation system in a greenhouse and greenhouse
The process of ventilating a standard greenhouse is usually provided for by its design itself - doors that open in warm weather.
Greenhouses, in turn, can be equipped as natural ventilation, and automatic hoods. Natural ventilation systems include vents and doors. Automatic systems are designed for regular ventilation, preventing the penetration of cold air into the greenhouse room.
Unusual buildings
- A mini-greenhouse is a cap made from a plastic bottle without a bottom, it is easy to make and is great for growing seedlings of plants that are painful to transplant. Immediately after planting the seeds, the cap must be closed with a lid, and when the temperature during the day is above 20 degrees, it can be removed.
- Neat houses made from old window frames help ensure comfortable growth for plants and serve as a stunning decoration for a summer cottage.
- The dome is a large polygonal building with a wooden frame covered with ordinary oilcloth. Despite the complexity of construction, this dome-shaped structure is attractive, stable and has excellent light penetration.
- The box, consisting of four boards and a window frame, is a small original greenhouse for flowers and low-growing plants.
- A practical folding greenhouse made from modern small-diameter PVC pipes and regular polyethylene film.
- A greenhouse umbrella is a small original design made from a wooden barrel and an old oilcloth umbrella covered with plastic film.
- A greenhouse tent is a compact mobile structure made from a children's tent with walls equipped with oilcloth inserts.
- A plastic house is a greenhouse made from plastic bottles, which can be open or closed. Creating such a greenhouse does not require large expenses or special skills.
- A flowerbed is a small greenhouse made from a wooden frame of the required size, two thin plastic pipes and a piece of oilcloth. The convenience of this design is that if the air temperature rises to the required level, the oilcloth can be easily removed, and you will get a neat flowerbed.
- A mini-house is a cute greenhouse made of plastic boxes that is suitable for indoor plants and will decorate any standard balcony.
- It is enough to simply build a small greenhouse from old pallets covered with plastic film. This design is perfect for growing flowers and seedlings.
- From a standard plastic container you can build an excellent greenhouse for growing seedlings on the balcony.
You should not exclude the possibility of purchasing a ready-made greenhouse or greenhouse from trusted companies. Then you can get an advantage in the form of mandatory guarantee that this product is of high quality for long-term use. In addition, inIf you receive a defective product, you can exchange the greenhouse during the entire warranty period.Large suppliers offer greenhouses at affordable prices and provide all the information about the materials used for their manufacture.
As a rule, planting is done in the spring, but you need to take care of the conditions, in particular we are talking about protection from low temperatures. Especially when it comes to vegetables.
Greenhouses and greenhouses do an excellent job with this task. Let's see how to make it from almost improvised materials below.
How is a greenhouse different from a greenhouse?
Before delving into the question of how to make a greenhouse, let's determine what is the difference between a greenhouse and a greenhouse:

- A greenhouse is used for growing seedlings and further planting them in open beds; plants can be kept in a greenhouse all year round;
- The required level of temperature in the greenhouse is maintained due to the presence of compost or manure in the soil; in the greenhouse there is an additional, third-party source of heating;
- It is possible to grow trees in a greenhouse, but this cannot be done in a greenhouse.

What types of greenhouses are there?
The greenhouse can be stationary or portable (a photo of a greenhouse at the dacha is presented below).

A stationary greenhouse can have any shape, the most common model is the butterfly (it got its name due to the doors that open on both sides).

Portable, often in the form of a tunnel. The main material in both cases is polymer film.

From all this it follows that it is quite possible to make a greenhouse with your own hands; this is the same creative process as growing cucumbers, tomatoes, etc.

Material selection
Before we look at how to make a greenhouse with our own hands, let’s look at the issue of choosing the material.
When choosing a material, it must be taken into account that it must meet the following requirements:

- Good light transmission;
- Resistance to various types of deformation, such as strong gusts of wind;
- Easy to install and assemble the entire structure;
- Durability.

As for the materials used, the cheapest, and most importantly practical, is film, and here are its types:

- polyethylene;
- stabilized film;
- polyvinyl chloride

Covering materials include:

- agril;
- lutrasil.

In order to finally decide and understand which material is preferable, it is necessary to compare them and consider the pros and cons of each.

Glass
The advantages of glass include: it transmits approximately 94% of light, lasts a long time, and retains heat.
The disadvantages: it gets very hot in the summer, there is a heavy load on the main frame.

Film
The advantages of this material include: low cost, low weight, no foundation required.
Pay attention!


Disadvantages: fragility, difficult to wash.

Polycarbonate
Pros: transmits light well, high level of thermal insulation, lightweight and durable.

What to use to make a greenhouse frame
The frame is a kind of base for a greenhouse; most often it is made of wood or plastic, less often of metal pipes.

Wooden frame
The main advantage is its environmental friendliness. It is also worth noting that it is very simple in terms of installation.

For installation you will need the following tools: hammer, screwdriver, saw, nails, rubber as a sealing element, wooden beams, ruler.
Pay attention!


It is advisable to cover the wooden elements of the future structure with drying oil before the installation process.
Execution Sequence
First of all, a beam is attached to the mortgage fastening; it will then become the base. Then the main beam is placed around the perimeter of the foundation, and everything is temporarily secured with nails.

Side and corner beams are fastened diagonally with timber. The door frame is installed to the side posts. The cornice is attached to the top of the side and corner beams.

Roof
In the area of the points where the vertical beams are fixed, it is necessary to remove a beam, the length of which is 2 m. The roof beams must be fastened at an angle of 30 degrees, they are connected to each other by a beam. In the area of the end points they must be supported by vertical guides.

The final fastening of the roof frame is done using corners and strips on self-tapping screws.

Pay attention!

Doorway
First the door frame is attached. Do not forget that in the middle and upper parts the opening is secured with special stiffeners.

Application of metal pipes
A greenhouse, as mentioned above, can be made from metal pipes, and also with your own hands. This design is more wear-resistant.

You will need: a welding machine, a hammer, a grinder, a special attachment for working with metal (disc).
The pipe is divided into two equal parts. Tees are welded to the edges of the base pipe, and crosspieces are welded every half meter. The cut elements must be welded to the crosspieces.

Special tees are attached to the arch to secure the door pillar.

Covering the greenhouse
Once the frame is ready, you can start covering.

Film
The easiest material to use is film. It is necessary to cover the entire structure, leaving a margin of 15 cm, and then cut it off.

Polycarbonate
The front side of the polycarbonate is the one where the drawing is depicted. First you need to cut the sheets. Seal the sections with sealing tape on top and perforated tape on the bottom.

First, the polycarbonate is attached to the top, then to the sides. It is attached to the frame with a special profile, as well as rubber gaskets.

Finally, the seal and door hardware are installed.
Ventilation
In greenhouses, in order to create ventilation (ventilation), you just need to open the doors, but it is advisable to do this in warm weather.

A greenhouse is an indispensable thing for a gardener who is going to harvest a large harvest of tomatoes, cucumbers and other vegetables in the future. By approaching the design wisely and following all the instructions, everything will definitely work out.

DIY greenhouse photo

- The protective layer on which the inscriptions are applied must be located on the outside of the greenhouse.
- To obtain the most durable structure, be sure (!) to pay attention to the location of the polycarbonate “honeycombs” - they should go only vertically, in inclined structures - parallel to the slope.
- When creating arches, keep in mind that polycarbonate sheets bend only in one direction - lengthwise, that is, along the line of the stiffeners.
- The joints of the sheets should be at the center of the frame post; the sheets are connected only in this way.
- This type of plastic is cut with a construction knife, jigsaw, or grinder. You can also use a hacksaw or a circular saw.
- To firmly connect the sheets to each other, special plastic profiles. Manufacturers do not recommend overlapping polycarbonate. In practice, when making a polycarbonate greenhouse with your own hands, it is not always possible to cut and fit the sheets perfectly. Some craftsmen even manage to do without connecting profiles, placing polycarbonate overlapping. The most important thing is that the joint must be in the center of the rack, and not sag in the air. Moreover, even with ideal installation, snow pressure can force the sheet out of the profile. In the case of overlap, this does not happen.
- It is not advisable to use a powerful drill for screwing in self-tapping screws - it will overtighten the fasteners and often slip off during operation. It is better to work with a regular screwdriver. Polycarbonate is drilled at low speeds with little effort. Next, turn off the tool, insert the screws and continue working.
- The distance between the screws to be screwed in is 25-70 cm. It all depends on the type of frame and the expected snow and wind load.
- When assembling polycarbonate structures, rivets are sometimes used instead of self-tapping screws. However, dismantling the greenhouse or replacing a damaged sheet in this case will be more difficult.
- When the temperature changes, plastic can change size. When making butt joints, a small space of a couple of millimeters in size is necessarily left between the sheets - a technological gap. Otherwise, cracks will form at the junction. For the same reason, the size of the holes for fasteners is made a little larger. To prevent the plastic from cracking, do not tighten them all the way.
- To compensate for expansion and protect against cold bridges, it is recommended to use special thermal washers for polycarbonate (screws are purchased separately). It is allowed to use EPDM roofing screws, equipped with a gasket or standard for metal with a rubber thermal washer, in which the threads have a small pitch.