Covering “wet” areas with ceramic tiles is the most correct, and therefore very popular, way of finishing a bathroom. There is a huge range of tiled cladding on the market, thanks to which the apartment owner can create a unique, original interior, fully meeting his individual requirements and capabilities. But in order to carry out repairs correctly, you should prepare the walls of the room in advance for final finishing, which will be discussed below.
Requirements for walls for tiled finishing
When considering the benefits of tiles, professionals are sure to note the minimum requirements for the condition of the surface being tiled. Leveling the walls in the bathroom for tiles may be required only in two cases: if the surfaces are very uneven and have many defects, as well as in cases of using mosaic tiles to decorate a room, which places increased demands on the evenness of the surfaces being tiled.
To make sure that it is necessary to level the partitions under the tiles before repairs, you must first check the verticality of the walls. Ceramic tiles are installed exclusively on perfectly vertical surfaces. When attempting to install on a surface with significant unevenness and other imperfections, it may be necessary to pre-cut the cladding, which will negatively affect the attractiveness of the interior.
To check the wall for verticality, use a standard plumb line. To do this, a nail is fixed at the top of the wall, after which the position of the thread next to the floor is checked. If the distance from the thread to the wall at floor level is exactly the same as next to the fixed nail, the wall is considered level and vertical. Leveling the walls for tiles is required if the vertical slope is more than 1 cm.
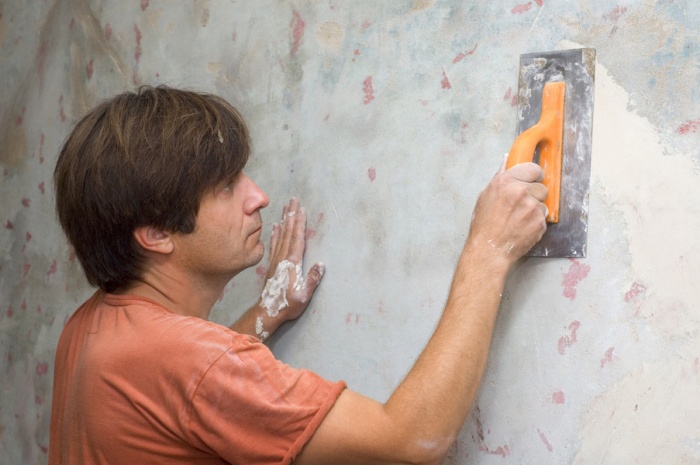
After checking the verticality, you need to make sure that there are no irregularities in the wall. This can be done with a long rod or a rule: you need to apply the tool to the surface and evaluate the presence of depressions and significant protrusions on it. The check must be carried out repeatedly, on different sections of the wall than more surface will be checked, the more accurately its condition can be determined. A large number of defects leads to the need to level the surface using plasterboard sheets. The type of gypsum board fastening is selected taking into account the size of the protrusions on the wall. If they are more than 2 cm, then the sheets should be attached to the sheathing; to eliminate smaller defects, you can level the surface with plasterboard, securing the sheets with screws or glue directly to the wall.
If there are significant depressions and potholes on the wall, they will first have to be filled. In each individual case, an individual set of preparatory work is required before final finishing using tiles. To find out how to level the walls in the bathroom, you need to take into account all the identified surface defects. Only large peaks and valleys and vertical deviations require alignment. If there are minor defects and cracks, the wall can be tiled without prior preparation.
Leveling walls in “wet” areas with cement mortar
Surface leveling method cement mortar suitable for eliminating almost any shortcomings. Before starting repairs, you should purchase the required amount of cement and sand. There is no need to be afraid to buy a little more mixture than required; good cement will definitely come in handy on the farm more than once, especially since it can maintain its technical characteristics for a long time.
For repairs you will also need plaster, rope, tape measure, plumb line, level and slats for beacons. Having everything necessary tools, you can deal with the most significant defects of the walls, which are vertical deviations. If the wall is not only tilted, but also has significant potholes and depressions, the repair procedure will be even more difficult.
So, in order to level the walls in the bathroom, you need to first evaluate the surface for the presence of crumbling areas. If they are found, they are carefully removed with a construction hammer. Now you need to prepare some cement mortar according to the manufacturer’s instructions and install beacons along the wall. The first beacon is mounted at a distance of up to 300 mm from the corner; the distance between several beacons should be less than the total length of the rule used.
To install a beacon, you need to throw a vertical strip of cement mortar over the entire height of the wall. The lighthouse batten is sunk into this solution and its verticality is checked with a level. If the rail is not initially vertical, it is adjusted by pressing in the right places. The second beacon is installed in exactly the same way at a distance from the first slightly less than the length of the existing rule. When the beacons are installed, you need to give them a little time for the solution to completely harden, usually no more than 3-4 hours.
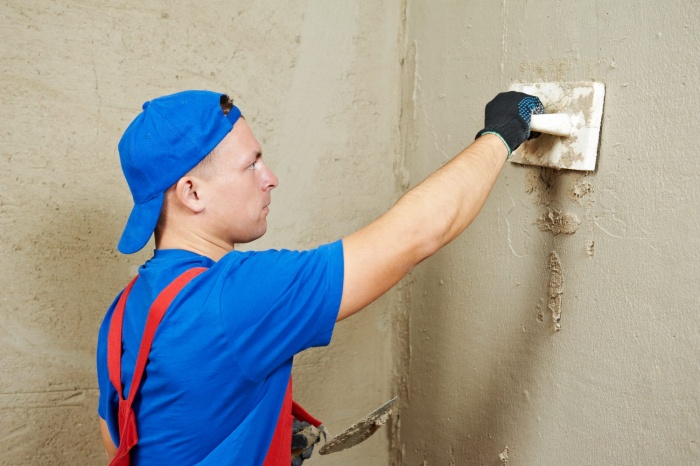
You can level the walls in the bathroom under the tiles using cement mortar only by throwing the mortar onto the wall. If the mixture is simply spread on the surface, then its adhesion will be unsatisfactory, which is very important, given the large size of the ceramic tiles.
You can use a trowel or ladle to apply the mortar. It is very important to throw the cement mixture in such a way that it lies in even rows on the surface to be treated without gaps. In the process of filling the distance between the beacons with solution, you will definitely learn how to do such a simple job that only seems complicated.

The mass is thrown onto the surface from bottom to top, trying to maintain a layer thickness of no more than 1-2 centimeters of the thickness of the slats used for beacons. Every 50-60 centimeters of the wall covered with mortar, excess cement must be removed as a rule, leaning it against the beacons and moving it from the bottom up. The excess remaining on the rule can simply be dumped back into the bucket with the solution.
When one section of the wall is sealed with mortar, you can move on to the next section. You should not be afraid of throwing on too large a layer of concrete, even if it cracks a little after drying, this will not have a negative impact on the quality of adhesion of the final layer of cladding to the surface being treated.
Leveling the wall in the bathroom with plasterboard - features and difficulties
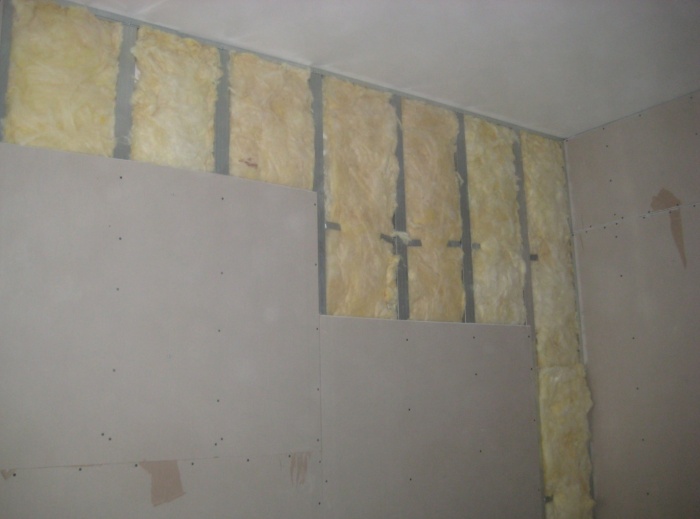
The second method of preparing a tiled surface for repair involves installing moisture-resistant plasterboard sheets over the entire wall area. This method allows you to effectively level a wall, even if it has very serious defects and protrusions. First you need to mark the wall for installing horizontal metal profiles. They should be spaced 60cm apart when using standard size plasterboard sheets. Professionals also recommend installing vertical profiles. It is not necessary to attach drywall to them; the main thing is that they will not allow the sheets being mounted to sag towards the wall. To prepare metal profiles suitable for the length and height of the room, they are first cut with metal scissors.

The guide profile is fixed on the floor with dowels, and on the wall - suspensions at a distance of up to 60 cm from each other. It is very important that all installed hangers are located on the same vertical line. Now the outer profiles are installed, the evenness of which must be controlled by a level. After the profiles are installed, they are secured with self-tapping screws, and the long perforated strips are bent so that they do not interfere with the installation of hyposarton.
Ropes are pulled between the outer profiles to install vertical profiles. When installing gypsum boards of a standard size of 1.2 m, the axis line of the vertical profiles should be located on the edge of the sheet. The distance between the individual profiles in the middle of the gypsum board may vary depending on the configuration of the wall and the thickness of the material used.
When all the preliminary work is completed, all that remains is to secure the plasterboard to the profiles with self-tapping screws. Screw in the screws slowly and carefully. Drywall is a fragile material, and with a high torque, the head of the screw can push through the slab. The joints of all slabs should be located along the axes of the profiles, while there should be enough space on the profiles for installing the second, third and all other purchased plasterboard slabs on the wall.
When deciding how to line the walls in the bathroom with tiles, you should not even consider the option of pre-finishing the surface with plaster. This material is not durable and may simply not withstand the weight of the tiles installed on top of it. If installing gypsum boards on the sheathing seems too complicated, and the wall does not have protrusions larger than 2 cm, drywall can be installed directly on the wall, securing the sheets with self-tapping screws or special glue.
There are no walls that are smooth enough for laying tiles. The surface should always be leveled, since even a few millimeters of unevenness will spoil appearance canvases. 
The important alignment process is straightforward and can be done by anyone, but it does require time, attention to detail, and effort.
The problem of wall curvature is especially acute in old houses. As a result of repeated repair and finishing work, each layer forms unevenness.
During major renovations in preparation for laying tiles, before starting preparatory work, it is recommended to remove the old finishing layers completely, stripping the walls to the base.
In some cases, local roughness problems can be solved with putty, while in others drastic measures are necessary.
The need for major preparation with stripping of the coating for cladding to the base is determined based on:
- angle accuracy;
- the presence of protrusions and depressions;
- line changes.
You can check the evenness of the walls using plumb lines, slats, a thin cord and a measuring tape. Alignment of the walls is necessary if the deviation on any plane is more than 3 mm.
There are 2 ways to solve the problem: plastering to eliminate local and minor defects, or covering with sheet materials.

The first method is comparatively more labor-intensive, and at the same time solves the problem better. Sheathing with plastic or plasterboard allows you to compensate for the significant curvature of the bathroom walls.
Important! The procedure for leveling walls for laying ceramic tiles is of key importance for the appearance of the coating and its durability. The work should be carried out carefully, choosing high-quality materials without excessive savings.
Ceramic tiles are rightfully considered the best finishing material. It has a number of advantages, which include durability, hygiene, strength and aesthetic appearance. However, due to the high cost of the material, it makes sense to take care of leveling the base so that the tile looks decent. Leveling is important when laying any type of tile, and for ceramic tiles it is necessary.
Important! Tile laid on a base with defects has a significantly reduced durability due to voids in areas of unevenness. Before you start working with tiles, you should carefully level the walls.
Materials
The choice of material for leveling walls before cladding depends on the condition of the coating and the degree of its curvature. You can use plaster or drywall. In both cases preference should be given quality materials, because
Important! Saving on the basis always turns out to be unprofitable, especially when it comes to expensive ceramic tiles.
Drywall

When walls intended for laying tiles have significant curvature, it is more cost-effective to use sheet material. Drywall is used in cases where too large a layer of plaster is required to eliminate defects.
There are 2 types of fixation sheet material: construction of a frame from a steel profile and installation with special glue. In the case of gluing material to the wall, usually the sequence of work is as follows:
- Cleaning the wall of dirt and treating it with a deep penetration primer to prevent the development of microflora under the tiles.
- Cutting sheets of drywall to the required size using a jigsaw.
- Gluing fragments. In this case, the glue is applied pointwise, the elements are mounted from the bottom up and their evenness is controlled by a level, with correction with a rubber hammer as necessary.
- Final sealing. After the glue has dried, the joints are sealed with silicone sealant, and the sheets are covered with fine moisture-resistant putty.
Pay attention! When installing a metal wall frame, it is enough to assemble and cut the structure, and then secure it using a level.
Plaster: which is better?

The most common leveling method is to apply cement mortar to the wall. Also an economical material is a cement-sand-lime mixture, known as prancing. When applying a thick layer (more than 5 mm), the plaster is applied using steel reinforcing mesh.
The disadvantages of traditional materials include the duration of complete hardening of up to a month and the high risk of unsatisfactory quality if the ratio of sand, water and cement in the solution is incorrect.
A more modern and reliable option is a ready-made waterproof putty for the bathroom, produced industrially.
After choosing a leveling method based on the dimensions of the room and the degree of unevenness of the walls, you should begin processing the base surface. The sequence of work depends on what kind of coating was previously on the wall. Removal technology old tiles, paints and plasters should be considered separately.
If there are old tiles, they are removed using a chisel with a hammer and a hammer drill. A hammer drill significantly speeds up the work process, and you can pry loose tiles with a chisel. Unlike other work with tiles, it is more convenient to remove from top to bottom.
Important! This will avoid the risk of injury if the layer collapses.

The paint layer can be easily removed from the wall using a hair dryer and a spatula. To simplify the work, you can use special paint removal solutions, taking precautions.
After removing the top layers, the base is visually inspected for defects. Old layers of plaster are removed.
Obvious depressions are sealed with cement-sand mortar first.
If there are cracks in the wall, they should be slightly widened and then carefully repaired. In these places it is recommended to make small notches for better adhesion of the layers. It is advisable to make notches along the entire wall to improve the adhesion of the applied solution.
This method is most effective on smooth reinforced concrete walls.
It wouldn’t hurt to treat the base with a primer. It makes sense to perform all of the above actions after removing all the old layers accumulated from previous repairs.
Attention! The listed measures are necessary when using the plastering method, and the base is uneven within 6 mm. In other cases, moisture-resistant drywall is mounted on any surface.
Brick
The most problematic walls are in brick buildings, especially when they have been in use for more than 10 years. Leveling can be done by plastering, but in most cases sheet material is a more acceptable option. The curvature of wall surfaces in brick houses can reach 5 cm.
Important! It is not advisable to use plaster.
Tree

The main problem with wooden walls is the high difficulty of removing the old coating from them. Removing layers of old plaster from wooden wall often more difficult than erecting an additional partition.
Concrete
In panel houses, problems with uneven apartment walls rarely arise. If the wall block does not have structural defects, the best option is to remove the finishing to the base and apply an even layer of plaster. In concrete buildings, sheet coating is used in rare cases, when working on a large area or when there are foundation defects.
Monolith
In monolithic buildings, the load-bearing wall is made of concrete, and the rest is made of foam concrete or gypsum. In apartments of monolithic buildings, significant curvature of the bases does not occur, so the plastering method is always preferable.
Preparatory work and cleaning

The traditional method of leveling walls is to scrape down to a base coat and apply plaster. This method is the most common and appropriate even for unevenness reaching 5 cm.
Preparatory activities are carried out in the following sequence:
- Removing old finishing layers with a spatula. To reduce dust in the room during the process, it is convenient to use a spray bottle.
- Expanding obvious cracks with a trowel and then filling them with cement.
- Applying primer to the cleaned surface. At the same time, deeply penetrating mixtures are recommended for porous walls, and concrete contact mixtures are recommended for dense walls.
- It is advisable to reinforce all loose and fragile places on the walls with steel mesh. In apartments it is better to use chain-link, and in private houses it is more convenient to use shingles.
Beacons are mounted along plumb lines in increments of up to 150 cm for ease of alignment. After this, you can proceed directly to plastering the wall to level it before laying the tiles.
Attention! When plastering, it is important to take into account that this is a dirty finishing job, so plumbers household appliances and other interior elements should be covered with film, and yourself should be protected with a respirator and protective clothing.
Cutting down hillocks

An important step in removing the old layer of plaster is cutting down the mounds. This is often where the leveling of walls without tiles begins. For plaster and gypsum, it is convenient to use a chisel and a hammer, and for denser layers, a hammer drill or sander. It is important to select the correct attachments and discs for the material to avoid damage to the tools.
Important! Particular care must be taken where wiring runs, usually under the ceiling, in corners and near outlets.
Additional hanging
Finishing work is carried out from bottom to top. Therefore, for hanging, it is necessary to install slats around the perimeter of the floor. They are installed at the height of the finished floor or baseboard. After installing the slats, the surface is hung to install beacons along the upper level on each wall.
Beacons must be stretched strictly along a flat, horizontal or vertical line.
For hanging vertical beacons, a plumb line is used, and for horizontal ones, a level is used. When installing beacons, the thickness of the tiles and plaster layers is taken into account. The beacons are attached to the same mortar as the tiles, using nail marks installed during the hanging process.
The purpose of hanging is to find out the most protruding part of the wall in order to plaster the entire wall up to this line, so this stage is carried out after cutting down the mounds. The tools you will need are: a level, a plumb line, a long ruler, nails, even slats for the beacons and clamps for attaching them.
Hanging algorithm

Hanging is necessary to create an even finishing coating for the tiles. The hanging technology is as follows:
- At a distance of 30-40 cm from the ceiling, the first nail is driven in, the head of which should approximately mark the thickness of the plaster mortar;
- a plumb line descends from the nail, along which a second nail is driven in similarly 30 cm above the floor;
- a third nail is driven between them along the same plumb line;
- the procedure is repeated in another corner of the same wall;
- to check diagonally, tighten 1 from 6 and 2 from 4 nails with a cord;
- where the cord touches the base, the unevenness on the wall is cut off;
- Beacons are installed and fixed along the nail heads.
When hanging, the distance between the nails should not exceed 2 m. On long or uneven walls, you can hang a central vertical row of beacons. Lighthouses should retreat from the corners by 10-12 cm.
How to properly level the walls in a new building?
The process of leveling the base for tiles in old houses and new buildings is slightly different. The difference is that in new apartments, dismantling the coating is usually not required. If the old coating is sufficiently smooth, it can also be left.
The tiles can also be glued to old tiles without plastering, using ceramic glue.
The best way to level: a tool for leveling under tiles

To plaster the wall before laying the tiles, you will need the following tools:
- level;
- roulette;
- rule;
- trowel;
- primer brush;
- wide spatula for plaster;
- bucket with a volume of 5 liters or more. for preparing a solution;
- drill with stirring attachment;
- grout grater;
- work gloves.
How to choose a starting mixture for leveling?
Plastering the walls before laying the tiles is done with cement-sand mortar, gypsum mixture or ready-made waterproof putty.
It is not advisable to use gypsum bases in wet rooms, since there is a possibility of deformation under high humidity, although manufacturers are often silent about this in the instructions.
What plaster should I use to plaster uneven walls with a large gap?
![]()
When leveling walls with significant differences, using ready-made mixtures is too expensive. An advantageous option for plastering is sand-cement mortar. It is made independently using traditional technology.
But there are nuances - you need to sift the sand well and monitor the ratio of water, cement and sand.
However, a common practice when leveling walls with large uneven areas is to use sheet material such as plasterboard.
What mixture should I use to level the tiles in the bathroom?
After fixing the beacons, you can begin to prepare the solution. You can buy it ready-made or mix it yourself. Homemade cement mortar is mixed in a ratio of 1:2 to 1:3 with sifted sand and moderate addition of water.
When choosing a proportion, follow the instructions on the bag. The solution is prepared in parts, with the expectation that you need to use up a portion in 30 minutes.
The applied plaster must dry, and the period for its hardening is also indicated in the instructions for the material.
Attention! When making the mixture, it is important to add the required amount of water, since working with a liquid solution is inconvenient.
When can follow-up work be carried out?

After completing the preparatory work of removing old finishing coatings and hanging, you should begin preparing and applying the solution. The mixture is prepared according to the instructions on the package. It is applied to the leveled wall with a spatula in small sections, with the rule aligned along the beacons.
After applying the solution to the entire wall, the beacons are carefully removed and the recesses are filled with the solution. The finished wall must be completely dry. A deep penetration primer is applied to the dry putty.
Attention! You can begin laying the tiles directly only after the primer has dried.
Conclusion
The problem for laying tiles is equal to uneven and smooth walls. All irregularities should be eliminated with level control, and notches should be made on reinforced concrete and other smooth surfaces before plastering.
Overview of methods


The only room in the apartment where the owners think least about the material for wall cladding is the bathroom. In 9 cases out of 10, these are ceramic tiles, which is due to difficult operating conditions: high humidity and temperature changes. Otherwise, it can be paint, PVC panels or waterproof wallpaper. At the same time, laying tiles, painting, and wallpapering are impossible without preparatory work, among which leveling the walls in the bathroom takes a leading place (for plastic panels you can skip this operation).
There are two reasons to level the wall:
- aesthetic - the finishing on a flat wall looks neat and does not spoil the overall impression of the apartment’s interior;
- technical - associated with the risk of voids forming under the tiles during the drying process of the glue due to its shrinkage. At any time in such places, the facing material may be damaged. The second scenario is possible - as the adhesive mass contracts, it drags away individual slabs of tiles, disrupting the harmony of the laid tiles.
Therefore, the procedure for leveling the walls is a mandatory step when finishing a bathroom. Currently, several methods are used, the pros and cons of which we will discuss below.
Drywall
The simplest and most affordable way to level the walls is to use drywall, but not ordinary, but moisture-resistant. The method has many advantages:
- the leveling process takes several hours;
- the technology does not require special knowledge or experience - the work is done with your own hands;
- you can hide significant plane defects;
- Communications are hidden under the plasterboard.
Among the disadvantages it should be noted:
- moisture-resistant drywall does not withstand in areas of high humidity: near the bathtub and above the sink. Here it is necessary to use plaster;
- installing gypsum plasterboard on the sheathing significantly reduces the usable area of the bathroom - at least 3 cm on each side;
- in many cases waterproofing work is necessary.
Plaster
The classic way to level walls is to apply plaster. The method has many positive aspects:
- you can achieve a perfectly smooth surface;
- after drying, the wall is ready to withstand any mechanical loads;
- indispensable in wet areas;
- withstands any tile, including porcelain stoneware;
- the area of the room is practically not reduced;
- consumables (cement and sand) are not very expensive.
The method also has disadvantages:
using the method when the height difference near the wall is more than 3 cm will be very expensive, since it will require large number materials;
- the technology is complex and requires skills;
- the process takes several days.
Bathroom wall surface requirements
Various finishing materials have their own requirements for the surface of the walls. Some materials require a perfectly smooth surface, while others generally reduce preparatory work to remove mold.
Under tiles
Tile laying specialists are often faced with a situation where the walls in the bathroom were not leveled for tiles - height differences were compensated for with tile adhesive. The results of such work appear very quickly - the glue shrinks when it dries (the shrinkage of a 5 cm layer of adhesive reaches 1 cm). It’s not hard to guess what happens to the tiles: they either crack or fall through with the glue.
However, perfectly smooth walls are not needed for laying tiles. Glue will cope perfectly with a height difference of 1 cm. The exception is mosaic tiles. It requires a smooth wall. The explanation is simple: in any case, the glue shrinks. It's not noticeable under standard tiles. Under the fine mosaic, all irregularities immediately become visible.
PVC panels
The only one finishing material, which does not respond to the curvature of the walls - panels made of polyvinyl chloride. The plastic decor is mounted on the lathing, which hides any errors and defects. Here, preparation for finishing work comes down to sealing cracks and potholes, as well as removing mold and black spots if they have appeared.
Coloring
Recently, the fashion for painting bathroom walls has returned. Under a layer of paint, any unevenness: height differences, potholes, cracks on the surface of the walls immediately become visible. Painting them does not hide, but sticks out. Therefore, before painting the bathroom, it is necessary to bring the surface of its walls to perfect condition.
Instructions for leveling walls
There are two ways to level the walls: by plastering or sheathing with plasterboard sheets. Each of them has their own strengths and weaknesses, which you can read about in the work: "". But there are several clarifying points regarding the bath:
1. It is better to plaster the walls under the tiles. There is no need to install beacons. The small area of plaster and a curvature tolerance of 1 cm allow you to carry out the work yourself, even with no experience.
As a last resort, if there is still no necessary plane, the wall can be puttied, smoothing out the mistakes made. Leveling the walls in the bathroom with plasterboard to match the tiles is justified only if the surface slope is more than 2.5 cm.
2. It is better to use gypsum board for painting, which allows you to get perfectly smooth walls. If the curvature of the surface is slight, you can do without a frame and glue the drywall directly to the walls. If there is significant curvature, in any case, you will have to install a sheathing and cover it with gypsum board.
Drywall
Apartment owners who have dealt with plasterboard will easily figure out how to line the walls in the bathroom with this material. For those who are encountering gypsum board wall cladding for the first time, we will describe the entire process step by step.
In practice, two methods are used to level gypsum board walls:
- without frame;
- with lathing.
No frame. This method existing species glue and technology make it possible to level a wall with a curvature of up to 4 cm. But only under wallpaper or paint. A thick layer of adhesive will not withstand the tile, which must be taken into account (tile tiling using gypsum plasterboard is carried out with a thickness of the adhesive mass of no more than 1 cm).
Step 1. The wall is cleaned of dirt, old plaster and mold. All types of recesses are sealed with putty. The ledges get knocked down. Using a plumb line and a level, the curvature of the wall is determined. If it does not exceed 1.5 cm, the gypsum board is glued directly to the wall.
Step 2. The wall is primed and then hung. Planks are attached to the sides of adjacent walls to control the vertical, and a line is drawn on the floor with chalk to set the horizontal. Drywall sheets are cut to fit the size of the wall.
In this case, technological gaps are left at the bottom and top (see photo).
Polyurethane foam (for painting) or Perlfix gypsum adhesive (for tiles) is applied to them. You can also use dry gypsum plaster.
Attention: when using dry plasters, professionals recommend adding PVA glue to the solution in a ratio of 3:1, where glue is 1 part.
Step 4. The sheet is applied to the wall and leveled in the horizontal and vertical plane (a level is required). You can change the plane of drywall only by pressing it against the wall. It won’t be possible to pull it inside the bathroom - the foam (glue) is not rubber and won’t pull out.
Step 5. After the glue has dried, the surface of the plasterboard is treated with a primer, and the joining seams are sealed with serpentine. Every other day, the surface of the drywall is puttied.
If the curvature of the surface exceeds 1.5 cm, spacers will help. To do this, the places with the greatest bend into the wall are determined. Strips of plasterboard are glued onto them, and then the gypsum board is glued. Application polyurethane foam excluded as an adhesive mass. It is advisable to use ready-made Fugenfüller putty or Perlfix dry mixture.
The technology is not complicated. If something remains unclear, you can read the material on this topic: “”.
With lathing. Large curvature of the walls requires the installation of sheathing. The work is performed in the following sequence:
- the wall is hung to determine the attachment points of the guide profile (NP);
- the locations of the ceiling profile (PP) are determined;
- hangers are attached to the line of passage of the PP profile;
- holes for dowels are drilled on the floor and ceiling;
- all types of profiles are cut to size using a grinder or a hacksaw;
- guide profiles are attached with self-tapping screws that are screwed into driven dowels;
- a ceiling profile is placed in the guide profile and secured with self-tapping screws;
- the vertically installed profile is additionally strengthened with hangers;
- Sheets of gypsum board are screwed onto the resulting sheathing with self-tapping screws.
Important: in materials on leveling walls in the bathroom you can find a recommendation to use wooden slats for lathing. Practice has shown that this cannot be done - they spin over time. A metal profile is needed.
The process is described in more detail in the material: "".
Plastering
The second method of leveling walls is plaster. How to properly level the walls in the bathroom using this method, we will consider below. There is no need to install beacons here. It is enough to draw a line along the floor, walls and ceiling along the surface of the plaster. The work algorithm is as follows:
- the walls are cleaned of old finishes: tiles or paint (such an operation is not required in a new building), as well as old plaster;
- loose bricks are removed, cracks and potholes are sealed;
- masonry seams are opened for better adhesion of the plaster to the wall;
- the surface is cleaned of volatile fats, blackening and mold;
- the surface is treated with a primer;
- hanging is carried out, during which the most convex point of the wall is determined;
- 3 mm is added to the found point and a contour of the future plaster surface is drawn along the walls, floor and ceiling;
- a solution is prepared for the first layer of plaster in a 1:1 ratio;
- the spray is applied in a thin layer - rubbed with a grater, spatula or paint brush;
- After the first layer has dried, the second layer is applied - primer. A solution is prepared for it according to a different recipe: 1 part M400 cement and 2 parts sand;
- A small area in the corner is being plastered. The surface is constantly monitored horizontally and vertically by the rule and the level;
- You can continue up or along the floor until you get a closed perimeter. Work continues again from the corner of the looped plaster. Here the reference point will be the already plastered wall.
There is nothing complicated, but constant monitoring of the plaster plane with a level is necessary. It is not advisable to perform the last operation, which is called “covering”. All roughness will be removed by glue.
Plaster without beacons is discussed in more detail in the work: "".
The nuances of working with different surface materials
There is no fundamental difference in the technology of leveling walls, depending on the material from which they are made, in modern buildings. The exception is old brick houses, where the walls of the bathroom and bathroom are laid out in one brick, and the plaster is made over a metal mesh.
It is very difficult to remove the plaster layer, since there is a high probability of destroying the wall. Therefore, they resort to partial cleaning of the peeling plaster after tapping the walls.
If you had to remove the mesh and remove the plaster completely, the brick must be treated with coating insulation before plastering. This way the wall is protected from destruction due to high humidity.
If the walls are made of plasterboard or wood, they are easier to replace.
At independent work There are always nuances that can affect both the quality of work and the speed of its completion. Professionals advise:
- Walls under plaster must be thoroughly cleaned. Any negligence can lead to peeling of the plaster layer along with the tiles;
- to avoid mistakes when preparing the solution, it is better to buy ready-made mixtures;
- the plaster must match the material of the walls;
- when choosing a mixture, you should pay attention to what phase of plastering work it is intended for (spray, primer, covering);
- You cannot experiment when preparing the solution - strictly follow the instructions;
- treating walls against fungus and mold is mandatory;
- It is advisable to buy primers and mixtures from the same manufacturer.
Conclusion
How to line the walls in the bathroom for tiles or painting is up to the owner to decide. The right choice will allow for a high-quality finish.
It is best to level the walls with plasterboard before painting. In this case, it can be placed on glue or screwed to the sheathing with self-tapping screws. For tiling a bathroom, plaster made without beacons is better suited - small errors can be removed with glue.
After the construction of a building, the walls inside the premises are rarely even. This is often found in multi-story brick buildings. The room intended for the bathroom especially needs to level the walls, since this room is finished with tiles. If you do not carefully prepare before fixing the finishing material, the room will look less attractive.
Alignment methods
There are several ways to level the walls in the bathroom. The choice of a particular option depends on the material of the bathroom walls. For example, certain methods are used only for leveling brick and concrete walls, others are used for leveling plastered partitions.
All alignment methods can be divided into several groups:
- leveling bathroom walls under tiles using special mixtures;
- use of plaster;
- use of drywall.
In order to correctly align the walls, it is necessary to consider each of the presented methods in more detail.
Leveling with plaster
Before leveling with plaster, you must first carefully prepare the wall. In the process of such work, you need to perform the following actions:
- Before leveling the walls in the bathroom, you need to remove old wallpaper or paint. If a tile was fixed to the wall, it must be completely removed and the wall must be cleaned of the composition on which this material was fixed.
- After this, you need to clean the surface from dust and remove metal elements if they were attached to the walls.
- Then check for unevenness using a level and plumb line.
- At the final stage of preparation, the beacons are secured.
Before applying plaster, a primer should be used to increase the adhesion of the mixture to the wall. Beacons can be fixed with plaster. Typically an industrial T-profile is used for this.

The plaster is diluted in water to form a thick dough. Using a trowel, the composition is applied to the wall, after which it must be leveled using a rule. Thanks to the beacons, there are no irregularities left on the surface, and the leveling process occurs quite quickly.
After applying plaster to a certain section of the wall, it is necessary to check the verticality of the surface with a plumb line. After completing the described work, it is necessary to wet the plaster every day so that cracks do not form on it due to uneven drying. You can level the walls in the bathroom with plaster without any experience in performing such work.
Leveling using building mixtures
In construction stores you can find many mixtures that are designed for leveling walls. The most popular are gypsum-based compositions. Before starting work, you must study the instructions, as the proportions may be different. Application occurs in the same way as when using plaster.
Corners can be leveled using a perforated profile. The use of such compositions is practically no different from the process of applying plaster. The advantages of using mixtures include:
- Easy to prepare. Since the mixtures are sold ready-made, it is enough to dilute them in the specified amount of water and mix thoroughly.
- Reliability. Unlike homemade plaster, ready-made mixtures are of higher quality.
- Drying speed.
- The presence of components that prevent the appearance of mold and mildew.
It is worth noting that such mixtures improve adhesion to almost any material.

Leveling walls with plasterboard
Leveling the surface of bathroom walls using mortars involves spending a lot of time. At the same time, the whole process is quite labor-intensive. This is why many people use drywall to level walls. Before purchasing this material, it is worth calculating its quantity by measuring the area of the walls to be leveled. When making calculations, it is worth considering that about 10 percent of the purchased material may be lost during pruning.

After cleaning the walls from old finishing materials and dirt, the surface is marked for installation of metal guides. Hangers are screwed onto the wall under each profile, the distance between which should be equal to the width of the plasterboard sheet. Fixing occurs when using a plumb line and level. Installation of profiles is carried out using self-tapping screws.
The drywall on the studs is also secured with self-tapping screws. After finishing all the walls, it is necessary to seal the joints between the sheets using sealants.
Advantages of drywall as a basis for laying tiles
The advantages of drywall as a material on which the tiles will be fixed include:


The described material is used by many apartment owners more often than building mixtures.
Which drywall to choose
Drywall is gypsum and cellulose waste paper pressed into sheets. This material is environmentally friendly and lightweight. And also thermal insulation characteristics. But since there are several types of drywall, before purchasing, you need to find out which type of material is best suited for lining the walls in the bathroom. Two types of drywall are produced:
- GVL is a material that is used when remodeling rooms and, according to regulations, can only be used in rooms with a normal level of humidity.
- GVLV - this type of drywall has a hydrophobic impregnation that protects the material from moisture. That is why it is used in finishing kitchens and bathrooms.
If you use drywall that is not intended for installation in a bathroom, it may become deformed when applying adhesive.
Selecting adhesive for cladding plasterboard surfaces
Before purchasing glue, you need to find out what surface the selected composition is compatible with. To glue tiles to drywall, you can choose one of the following adhesives:
- glue, which contains cement and is intended for application to a paper base;
- elastic adhesive created for tiles, which is diluted independently or sold as a ready-made mixture;
- liquid nails.
When preparing the solution, you must strictly follow the manufacturer's recommendations indicated on the packaging. If this is not done, the composition may become less durable.
Important! You should not prepare a large volume of glue at once.
Drywall primer for tiles
After installing the drywall sheets, the joints between them must be treated with putty. This is necessary to create a monolithic structure. You should choose only those compounds that are created specifically for processing joints of plasterboard sheets.
After this, the surface is treated with a primer. The choice of composition should be based on the characteristics of the material and glue that will be used to secure the tiles. In the instructions for the purchased product you can find information about what glue it is compatible with.

The primer is applied using a paint roller, brush or notched float. A more convenient tool is a roller, as it allows you to evenly distribute the material over the surface.
How to glue tiles to drywall
The tiles are fixed to drywall in the same way as when installed on other types of surfaces:
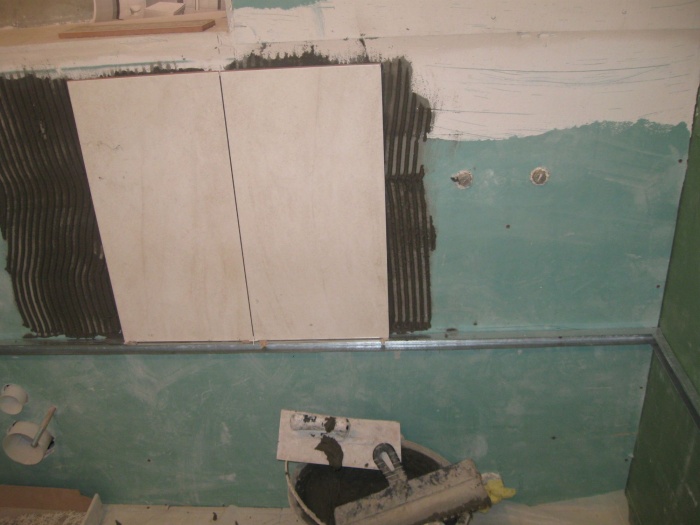
- First, apply the adhesive solution with a notched trowel to an area of approximately 1 square meter.
- After this, the tile is pressed against the composition with force. To ensure that the finishing material is positioned evenly, its position should be changed using a hammer with a rubber nozzle.
- Plastic crosses must be placed between the tiles. They allow you to evenly distribute the material and create smooth technological seams.
- After fixing the tiles on all walls, you must wait for the adhesive to dry. This usually takes several days.
- The final stage of work is grouting the joints and coating them with a special varnish.
Important! You should not attach more than five rows to the wall. This is due to the fact that when gluing each row, the load on the base increases significantly. The sixth and subsequent rows should be secured only after an hour break.
Conclusion
Having considered all the presented methods, you can choose a leveling material for the bathtub that is better suited for a particular apartment.
Finishing a bathroom with ceramic tiles – best option by all indicators. It's not only traditional way, but also, thanks modern technologies production, very popular. A huge variety of types of tiles allows designers to create unique interiors, from the most expensive exclusive ones to cheap budget ones. Despite the large difference in the cost of materials, every consumer has the opportunity to buy beautiful and high-quality tiles at a very reasonable price.
Among the many advantages of ceramic tiles, there is one very important one from the point of view of builders - there is no need to make the wall perfectly flat underneath it. Height variations of up to a centimeter are eliminated during tile laying; there is no need to waste time and money on preparatory work.
Except, of course, mosaic tiles. You will have to carefully level the surfaces under it; this material does not tolerate unevenness, and it is very difficult to eliminate wall problems by adjusting the thickness of the glue. Such work can only be carried out by real professional tilers with extensive practical experience.
We will talk about several technologies for leveling surfaces for all types of ceramic tiles, taking into account the actual condition of the walls.
Materials for leveling under tiles
We will not consider specific manufacturers; there are a lot of them, both domestic and foreign. Let's talk only about the types of materials.
| Material type | Brief characteristics |
|---|---|
| Traditional materials are distinguished by the highest performance indicators. Universal use, suitable for all types finishing walls Due to high strength and adhesion with all building materials increase the stability of load-bearing walls, protect the brick from further destruction. There are waterproof types that may have innovative additives to improve physical performance. The price is available to all consumers. | |
| An extremely unfortunate option due to the high hygroscopicity of the material. Although samples with reduced hygroscopicity have now appeared, builders do not recommend using them as the main material for leveling walls in the bathroom. The main advantage is that they are quickly grasped, thereby speeding up the work time. But this can also be considered a disadvantage - only professionals can work with them. | |
| Currently, these materials are very popular among construction companies. Leveling the walls is done quickly, and the cost of the work is estimated to be much higher than when using cement mixtures. The result is that companies significantly increase profits. For bathrooms, you can only use moisture-resistant OSB and plasterboard boards. |
cement plaster for bathroom
Algorithm for leveling walls under tiles
All work should be approached thoughtfully, this also applies to leveling the walls in the bathroom. Before choosing material for leveling, you need to carefully inspect the walls.
What should you pay attention to first? How does the actual condition of surfaces influence the choice of technology?
- Check that all walls are vertical. This is the main indicator; the choice of optimal technology largely depends on it. The peculiarity of ceramic tiles is that they should be laid only on vertical surfaces, otherwise they will have to be cut into wedges in the corners. And this is not only unsightly, but also indicates the low qualifications of the tiler.
The verticality of the walls is checked with an ordinary plumb line. Secure the nail at the top of the wall and look at the position of the thread at the bottom. To see deviations more clearly, you can use a ruler or tape measure. Lean it against the wall near the ceiling and near the floor, measure the difference in readings. If the difference is more than a centimeter, then the wall will have to be leveled. Moreover, it is allowed to use only plaster or drywall on profiles. The angle between the walls may differ from a straight line, this is not a problem for tiles.
- Using a long rule or a lath, check the condition of the surfaces for protrusions and depressions. Lean the tool in several places, the more often the better. If there are many irregularities, but they are insignificant in size, then it is better to level the walls with OSB or plasterboard boards. Moreover, they can be glued directly to the wall without metal profiles.
Checking the evenness of the walls
- If the unevenness is more than two centimeters and there are many of them, then it is optimal to plaster the wall or level it with plasterboard boards on a metal frame.
Each case requires an individual approach. Sometimes it is enough to cut down a few large protrusions and fill up critical recesses, slightly correct the surface with putty - and the wall surface is prepared for facing with ceramic tiles. At this point the leveling work can be considered complete. All other irregularities are eliminated with glue during laying of the tiles. As for shallow cracks, in most cases they can be left untouched; they do not have any effect on the quality of the finish. If you are planning to refinish your bathroom mosaic tiles, then the walls must be carefully prepared. This can be done with cement-based plasters (reliable, but time consuming and expensive) or with slabs (much faster). Which option to choose is up to you.
We will look at three options for leveling walls, each of them has its own characteristics and requires special knowledge.
Leveling bathroom walls with cement-sand mortars
This method can be used in all cases without exception; it is the most traditional and in demand by responsible builders. To carry out the work, you need to purchase a dry mixture, the quantity depends on the amount of work. But don’t be afraid if a little material remains, it will always be useful in the future. And if the dry mixture is tightly packed and stored under proper conditions, it retains its original properties for quite a long time.
Prepare plasterer's tools, metal or wooden slats for beacons, a level, a plumb line, a rope, and a tape measure.
As an example, we will consider the most difficult case - the walls not only have large unevenness, but also deviate vertically. In addition, the old brick in the bathroom has begun to crumble and needs to be strengthened.
Step 1. Use a construction hammer or chisel to remove crumbling parts of bricks. Ideally, you need to get to integers.
Apply Betonkontakt primer to the walls
Step 2. Prepare some solution according to the manufacturer's instructions. Place the beacons, the first should be at a distance of approximately 20–30 cm from the corner. The distance between all beacons is slightly less than the length of the rule. Before installing the beacons, you should already know what thickness of plaster you need to apply.
How to install beacons?
- Throw the mass with a vertical tape to the height of the room, drown the lighthouse in it. Using a level, set it exactly in a vertical position; to do this, lean the plane of the tool against the metal profile and press it in the right places.
- Do the same operation at the opposite corner of the wall. If the size of the room is larger than the length of the rule, then intermediate beacons should be made. They are done in exactly the same way, and alignment on the plane is done by a rule or by stretching ropes between the outer beacons. Allow time for the mass to cool; further work can be carried out after 2–3 hours.
Do not forget to wet the surfaces of the walls before adding the mass. This should be done with an ordinary paint brush; it should be soaked in a container of water.
Important. Please note that we constantly say toss on rather than spread. Never spread it, this method of plastering not only looks funny, but also significantly worsens the adhesion strength of the mortar to the wall.
Practice throwing the weight with force; the flip flops should fall in even rows without gaps and at approximately the same height. The hand should be relaxed, the trowel should move simultaneously towards the wall and up or down. Learn to throw the solution left and right, up and down, take the mixture with both the side of the trowel and the end. It will take time to acquire the skills; if you are not good at it at all, it means that plastering is not for you. Seek help from professionals. But never spread the solution on the wall; it will fall off along with the ceramic tiles.
While the beacons on one wall are freezing, proceed to install them on the next, this will significantly speed up the work.
Step 3. Install plaster thickness limiters at the outer corners of the wall; they are always needed in door and window openings for finishing slopes.
How are they installed? To do this, you will need smooth thin boards, nails or dowels (depending on the wall material), any pieces of lumber for spacers, and homemade metal clamps. If the layer of plaster is small, then you can use factory-made metal corners. But we consider it more effective to use thin boards as guides - with their help you can adjust any thickness, and the devices are installed much faster. The boards are fixed in any way in the corner (nailed, clamped with spacers, homemade clamps made of metal rods, glued with glue or plaster, etc.), the position is aligned with the already installed beacons. After the plaster has hardened, the boards are removed. Another advantage of the method we propose is that the corner is plastered simultaneously with the wall, which not only speeds up the work, but also increases the strength of the plaster; it has no seams.
Step 4. Start plastering. Throw the mass from the bottom up, the thickness is about a centimeter or two greater than the height of the beacons. After approximately 50–70 cm, remove excess solution as a rule. Lift it up along the beacons while simultaneously moving left/right. Throw the collected excess back into the bucket, and immediately re-seal large depressions.
Step 5. Continue plastering the entire wall in this manner. Don't be afraid that in some places the layer of plaster will be very thick. If the thickness is more than 2 cm, then cracks will appear during drying, but in our case this is not a problem. Cracks do not have a negative impact on the quality of installation of ceramic tiles.
If you do not have enough experience with the rule, then large irregularities will have to be eliminated with a smoothing iron. You can work with it on slightly hardened plaster. No need to be perfect flat surface, level out only the large “waves”. If time is lost and the mass has become too hard, then moisten it a little with water.
This completes the leveling of the bathroom walls with cement mortar.
Video - Tiling a bathroom
Leveling large uneven walls with slabs
We have already said that you can use various boards, but for example, let’s take the cheapest of them - moisture-resistant plasterboard.
Step 1. Marking the walls. Metal profiles should be located at a distance of 60 cm along the axes for standard sizes plasterboard boards. If they have to be cut, then the distance is changed so that the fixation is also along the edge of the cut.
We recommend installing additional vertical profiles; you don’t have to screw screws into them, the main thing is that they do not allow the plasterboard boards to sag. The length of the profile is equal to the height of the bathroom ceiling.
The elements are cut with metal scissors or a grinder with an abrasive disc. Don't be afraid that as a result high temperatures When cutting with a grinder, several millimeters of the zinc coating will be lost; the corrosion processes are so insignificant that this will not affect the stability and durability of the structure.
Step 2. Attach the guide profile to the floor; fixation is done with dowels. Attach perforated hangers to the wall, the distance between them is 50–60 cm. Make sure that all hangers are located exactly on the same vertical line.
Step 3. Proceed to install the outer profiles, use a level to do this. Once they are in a vertical position, secure them using metal screws. Bend long sections of perforated tape so that they do not create obstacles during installation of the sheets.
Step 4. Stretch the ropes between the extreme elements and mount all the remaining vertical profiles along them. If the walls have a complex configuration, then additionally install horizontal jumpers to secure sections of drywall. The width of standard drywall is 120 cm, the axis line of the vertical profiles should be located along the edge of the sheet, carefully monitor this parameter. The distance between the profiles located in the middle of the drywall can be changed taking into account its thickness and configuration.
Practical advice. If there are risks of mechanical loads on the wall, then in these places it is recommended to increase the number of vertical profiles. Drywall has low physical strength, and an increased number of fixation points increases resistance to mechanical loads. Reinforcing jumpers must be installed at all joints between drywall sections.
Step 5. Fasten the sheets of drywall to the installed profiles with self-tapping screws. Screw in the hardware very carefully, the strength of the gypsum is so low that if the torque is slightly exceeded, the head of the screw will completely push through the slab, and you will have to do the fastening in another place. Make sure that the joints of the plates are located exactly along the axis of the profile, leaving space for fixing the second sheet. The work requires certain practical skills; do not be upset if you have problems screwing in the screws the first time.
Use the same method to install all sheets, carefully working in window and door openings. There is no need to putty the seams and joints under ceramic tiles. Clean the surfaces only from dust and begin installing ceramic tiles.
Practical advice. It is recommended to use drywall with a thickness of at least 1.5–2.0 cm near the bathtub; be sure to reduce the distance between the vertical posts of the frame. Such measures serve as additional insurance and increase the performance of the structure. Ceramic tiles It is attached with glue; as soon as the slab bends, the glue cracks and the tile may fall off.
Leveling the walls in the bathroom with plasterboard slabs using glue
This method is recommended for use if the walls have a large number of irregularities, but their dimensions do not exceed one centimeter. The advantages of frameless drywall installation technology include the following indicators:
- rapidity. Compared to the traditional frame installation method, the speed of work approximately doubles;
- cheapness. The total estimated cost of wall leveling is reduced by at least 30%. The walls can be finished with thinner slabs; in addition, there is no need to buy metal frame elements;
- increased coating strength. By applying glue, the area of sagging areas is significantly reduced. This is very important in the case of finishing surfaces with ceramic tiles;
- manufacturability. The work can be performed by unskilled builders.
- At the corners of the wall, using the usual method, place vertical strips for beacons under the level. In the future, they can be dismantled or left, there is no difference. Try to do it in such a way that the wall is leveled with a minimum thickness of glue. This saves material and increases the usable volume of the room;
- at the top, bottom and in the middle of the outer beacons, pull the threads;
- Install dowels at a distance of approximately 40–50 cm along the threads; the height of the caps is adjusted according to the threads. This way you will get three rows of beacons, all the caps are located in the same plane. The back side of the plasterboard boards will rest on these caps while they are being glued.
Concrete drill
By reducing sagging areas, you can use slabs with a thickness of 10 mm or more.
Step 1. Mark the wall. You need to use reference beacons to mark the leveled plane. This should be done in the following sequence:
Practical advice. If you have long rule for the entire height of the wall, then two rows of support beacons are sufficient - at the top and at the bottom. If you need to fix small sections of sheets, then you need to install your own support beacons under each of them.
At this point the marking is complete, prepare the glue and cut the slabs to size.
Step 2. Using a trowel or spatula, spread the glue onto the wall; the height of the glue is approximately 2–3 cm greater than the height of the screw heads. The distance between the glue application points is 15–20 cm; in each case, adjust this parameter yourself. If you know in which places the load on the slabs will be maximum, then increase the number of glue fixation points in them. Due to this, the risks of sagging plasterboard boards are minimized.
Location of glue on the sheet
Step 3. Place the slab against the wall, level its position and generally press it against the support beacons (screw heads). Make sure that the drywall does not sag, for better alignment tap the surface with the rule in many places. You should start installing the sheets from the corner of the bathroom, first fix the whole slabs, measure and fix the sections last. It is difficult to work alone, attract help.
 . Remove any glue protruding from the seams immediately; after hardening, problems may arise. The material has such high adhesion rates that during cleaning it can damage the integrity of the plasterboard.
The boards should be glued for the first time. If for some reason the drywall bends, it is quite difficult to correct the error, keep this in mind. It is strictly forbidden to lean against freshly glued slabs; do not store materials near them. If, after the glue has hardened, it is discovered that the plane of the slab is concave, then it should be completely removed, the remaining glue should be scraped off, and all operations should be repeated again. This is unpleasant work, and it will take a lot of time.

We have given three methods for leveling bathroom walls under tiles. Each of them has its own characteristics and is not considered optimal for all cases. Make decisions individually, take into account the maximum number of factors. Including your construction skills.
moisture resistant plasterboard
Video - Leveling bathroom walls with plaster