So that the bathhouse brings not only physical, but also aesthetic pleasure, and serves for a long time- you need to provide it with a reliable, practical and beautiful roof. We will tell you how to install a bathhouse roof with your own hands: instructions for construction, as well as detailed diagrams and drawings, photos and videos of installation will help you cope with this difficult task without the help of specialists.
Types of roofing for a bathhouse
In most cases, there is a gable or pitched roof for a bathhouse. More complex designs are unjustified due to the small area of the bathhouse and the high complexity of their implementation.
The simplest option is a bathhouse with a pitched roof. It is justified if the bathhouse is adjacent to the wall of the house or more tall building. Based on the low cost and ease of installation, such roofing is most often found on small household plots. garden plots.
Despite its relative complexity in construction, a do-it-yourself gable roof for a bathhouse is much more popular. Under such a roof, you can equip a cold attic for storing bath brooms and other accessories, or equip an insulated attic, where you can equip a creative workshop or summer living room.
To prevent the insulated attic from becoming damp, good waterproofing must be installed on the ceiling. The following materials are used as insulation: mineral building wool, polystyrene foam, penoizol and other suitable heat insulators. Both the under-roof plane and the attic floor need to be insulated.
The design of the roof of the bathhouse and the features of its assembly
The strength frame of the entire roof structure is the rafter system. Unlike a residential building, the bath rafter system is made according to simplified schemes. If the size of the bathhouse building is small, then the trusses can be assembled directly on the ground and moved upward on ropes. This method is distinguished by its convenience, speed of construction and accuracy of the dimensions of each farm.
The second option is to assemble the “skeleton” of the roof right at the top. Top assembly required good experience, care and precision in work.
Do-it-yourself sauna roof construction video
Installation of attic floor
Considering the lightweight design of the bathhouse structure, for the arrangement of the attic floor, not concrete beams are taken, but wooden beam. When brick, not wooden walls, instead of timber, you can use metal channels or load-bearing profiles. The support of the floor and at the same time the basis of the roof is the mauerlat or the top beam of solid wood walls.
A well-dried 100x80 or 100x100 timber is used for the ceiling. The load-bearing elements of the ceiling are installed flush into the grooves selected for them in the body of the Mauerlat. The depth of the notches is at least 70 mm. This method is called blind cutting.
Alternatively, floor beams can be laid on top of the Mauerlat and serve as support for the rafter system. Thanks to this solution, it is possible to significantly increase the protrusion of the roof edge beyond the walls of the building.
The optimal beam span is up to 4 meters. Maximum - 6 meters. If the distance between the walls of the bathhouse is greater, you will have to use special profiled composite lumber or metal trusses.
A subfloor is laid on top of the beams. A waterproofing membrane is sewn from below to the beams, and lining or other ceiling material is placed on top of it.
When laying wiring in the bathhouse, do not forget about safety
If wiring is laid in the ceiling, it should always be laid in a polymer sleeve. Connections in the floors of wooden structures are not allowed!
Do-it-yourself roof for a bathhouse video
Do-it-yourself bathhouse roof: construction instructions
Let's consider the simplest option of how to make a roof in a bathhouse with your own hands - when the roof trusses are assembled on the ground and moved up for installation.
The farm itself consists of the following parts:
- two rafter legs;
- crossbar;
- base.
An edged board measuring 40x100 or 50x100 is suitable for rafter legs and crossbars. The base is used as an auxiliary element and serves for rigidity during lifting and installation of the truss. Subsequently, the base is removed.
Rafter system
How to make a bathhouse roof with your own hands and save on material? Use the option in which the truss base boards are also the load-bearing beams of the attic floor. In this case, the trusses will have to be installed in increments, according to the calculated requirements for the load strength of the floor beams.
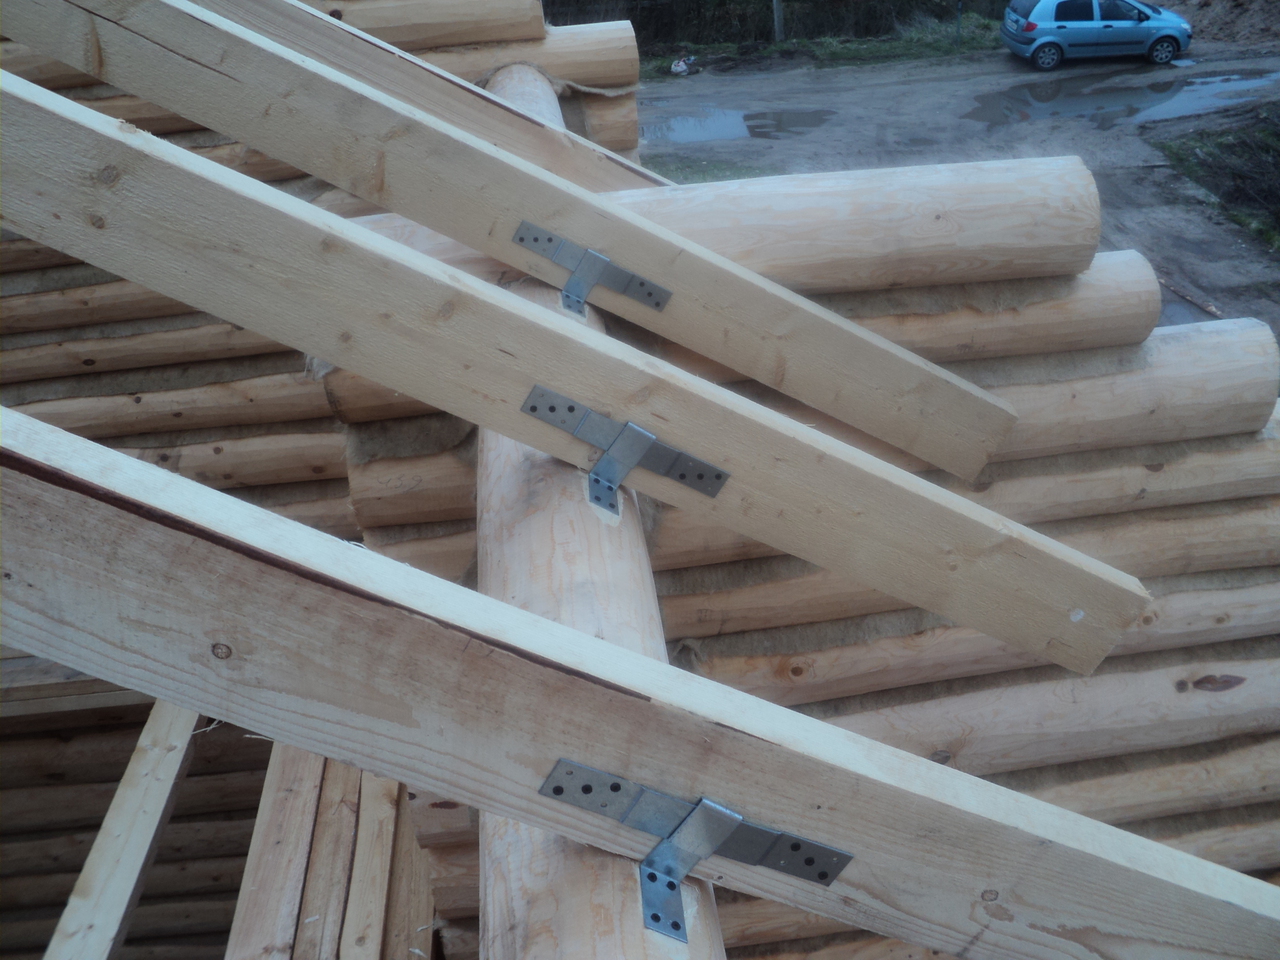
The rafter legs are attached to each other end-to-end or overlapping. It is also better to attach the crossbar with an overlap. Since fastening with nails loses strength over time, we recommend using threaded rods or bolts. A good option is to fasten the elements using metal plates on long screws. If the screws are very thick, we recommend drilling relief holes for them, slightly smaller than the diameter of the screw. Otherwise, thick screws may cause cracking and the board will lose its strength. The installation height of the crossbar is chosen so that the ceiling height of the under-roof room is sufficiently comfortable.
First, the outer trusses are installed and secured with temporary supports. Then two sheathing boards are placed on top to form the ridge. The remaining trusses are brought from below these boards and are also attached to them. To control the verticality of the installation, it is most convenient to use a plumb line.
Lathing
In our case, the sheathing not only serves as the basis for the roofing, but is also part of the “skeleton” of the roof, since it serves as the jib of the rafter structure. Therefore, for the sheathing it is better to take wide boards rather than slats. The step of filling the sheathing depends on the type of roofing material. The sheathing should protrude beyond the outer rafters by 25-35 cm.
Under a hard sheet roof such as slate or metal tiles, boards can be installed with gaps of 20-30 cm. A soft roof for a bathhouse requires continuous sheathing. It’s even better to use waterproof plywood or similar durable sheet material instead of boards. With any option, there should be two attachment points at the ends of the boards (and better in other places where they are connected to the rafters). The sheathing can be nailed, but it is better to use special notched nails for this. As practice shows, they are less loose and hold securely in wooden structures, even after many years of use.
How to make a roof on a bathhouse strong and durable
The higher the roof, the more the wind presses on it. If the rafter structure still needs to be further strengthened with internal jibs. They will increase folding rigidity and will protect the roof from the strongest winds.
We will equip a doorway and a viewing window on the outer truss
For the opening, we knock together a door frame from suitable blocks to fit the finished door leaf. We attach the box to a crossbar or transverse beam placed between the rafters. The lower part of the box is attached to a tie, which for this purpose is mounted in the outer truss.
We install a viewing window at the opposite end. After this, we cover the gables with boards and, if desired, decorate them with siding. To avoid gradual distortion of the frame due to the weight of the door, we reinforce the upper places with jibs.
Waterproofing is laid on top of the sheathing. For this purpose, special vapor barrier membranes, sheet roofing material or glassine are used. For a rigid roof, roofing felt or other viscous bitumen insulation is preferable. It more reliably seals the places where roofing screws pass. Under soft covering Any waterproofing material can be used for the roof.
Laying the roof
The material depends on the wishes and capabilities of the owner. To make the roof of your bathhouse look beautiful, choose modern roofing materials. Installation of the selected roofing material is done according to the manufacturer's instructions. Following his recommendations - best guarantee longevity of your roof.
Waterproofing can be laid both along and across the slopes. In practice, transverse laying provides better protection from moisture. To do this, the first layer spreads along the lower edge of the roof slope, each subsequent layer overlaps it by 15-20 cm. The result is an effect similar to fish scales: water easily rolls downhill and does not linger anywhere. If the waterproofing is rolled out from top to bottom, it is advisable to glue the seams with tape (for membranes) or fill them with liquid bitumen mastic (for roofing felt or roofing felt).
From below, between the rafters we fix mineral wool. It is needed not only for thermal insulation, but also to reduce noise from rain and hail. Then we line the insulation with a vapor-permeable membrane and cover it with decorative cladding.
How to build a sauna roof with your own hands video
Bottom line
As you can see, there is nothing particularly complicated in building a roof for a bathhouse. An ordinary summer resident can do this work. You will need the help of one more person, but you can do without the expensive work of specialists. The construction instructions will tell you the sequence of work, and your skills will show up during the work process. The experience gained from DIY construction will help you quickly troubleshoot problems associated with roof repairs many years later.
A bathhouse is a complex engineering structure, the construction of which is feasible with your own hands, but will require engineering knowledge and time. Special attention and the roof requires calculations, since the greatest heat loss occurs through the coating - from 30 to 45%. Construction of a roof requires a balanced approach and an accurate understanding of the type, structure of the roof and the material of its covering even before construction begins.
Stages of building a roof over a bathhouse
Work on installing a roof on a bathhouse, taking into account all standards and rules, is carried out in several stages:
- Choosing a roofing option, covering material and load-bearing structure.
- Collecting loads, performing drawings and calculations of the supporting structure, drawing up estimates and a list of necessary materials.
- Purchase of materials, preparation of the construction site and necessary tools.
- Construction.
Choosing a roof option
The choice of roof structure is influenced by the covering material, the purpose of the attic space - whether it will be heated with a residential attic or cold, as well as the level of wind and snow load in the region where construction is taking place.
Types of pitched roofs used in individual construction:
- Single-pitch. Sloping roofs with one slope are often used to cover small structures such as bathhouses when it is necessary to build quickly and inexpensively.
A pitched roof has the most simple design and is built very quickly
- Gable. If you need a greater roof slope and want to have a full-fledged attic space, they build a more complex gable roof.
A gable roof is more difficult to install, but it allows you to get a full-fledged attic space for storing bath accessories
- Hip and half-hip. Such roofs have 4 slopes - instead of gables, the ends of the house are also covered with a slope. Roofs of this type are built in climatic regions with high wind loads. A roof in which the end slopes - hips - descend to half the length of the main roofing covering is called half-hip.
The hip roof resists strong winds well due to the installation of additional slopes instead of end gables
- Tent. This is a special case of a hip roof, which is built over houses that are square in plan, as well as over bases that fit into a circle.
A hip roof is constructed in the same way as a hip roof, but does not have a ridge, since all the hips converge at one point
- Multi-pincer and combined. Multi-gable roofs are used to cover complex structures of L-shaped or U-shaped buildings, and at the same time they can be used in coatings different types roof shapes.
Multi-gable roofs consist of several roofing structures combined into one whole
- Attic. This is a very popular type of roof for residential buildings. They happen the most different shapes, but they are united by the presence of a warm living space in the attic space. Such roofs are also found on bathhouses.
Device mansard roof allows you to get a full-fledged living space on the second floor
The simplest option for construction is a pitched roof. It is often used when the bathhouse is attached to the main house, and with slight slopes of the roof. When building a free-standing bathhouse, the gable roof shape is most in demand.
Roof design
Factors influencing roof design:
- snow load on the roof, which is determined based on geographical location construction area;
- standardized heat transfer resistance, also depending on the climatic region. This parameter affects the choice of insulation thickness;
- weight of the structure. It depends on the roofing material;
- choice between attic and attic. Insulation of the roof above the attic affects its design and puts additional load on the rafters;
- type of bathhouse - an attached room or a separate building: the extension can be covered with a single-pitched structure, while it is more economical to complete a separate building with a gable roof;
- roof slope angle. His choice is influenced by the roof material, as well as the intended purpose of the roof space and the personal preferences of the owners.
Collection of loads on load-bearing roof elements
Snow and climatic regions are determined individually using maps attached to SP 50.13330.2010 “Thermal protection of buildings” SNiP 23–02–2003, updated edition. These maps are used to determine the specific snow load on the roof in winter. The load from the weight of the coating varies from 6 kg/m2 (Ondulin) to 55 kg/m2 (ceramic and cement-sand tiles).
Having planned a warm attic over the bathhouse, the weight of the insulation, vapor barrier layer and internal lining of the room is added to the weight of the roof - from 30 to 55 kg/m2, depending on the type of insulation and facing material. If the attic above the bathhouse is not heated, then only the weight of the under-roofing membrane is added, which can be neglected.
The weight of coniferous wood (pine, spruce, larch), from which roof structures are most often made, is determined as the product of density and volume. The density of wood is 600 kg/m3.
Table: specific snow load depending on region
| Region No. | 1 | 2 | 3 | 4 | 5 | 6 | 7 | 8 | 80 | 120 | 180 | 230 | 320 | 400 | 480 | 560 |
The region number is determined by the snow load distribution map issued by Roshydromet.
Each region of our country is assigned a number depending on the average intensity of snow load
The height of the passage under the roof slope is standardized and must be at least 1.6 m to allow periodic inspection of the technical condition of structures.
When choosing a roof slope angle of up to 20 o, the covering can be made of metal profiled sheets, including metal tiles; with a slope of 20 to 40 o, any roofing material can be used, except for rolled bitumen-polymer roofing materials.
Table: roof angle depending on roofing material
Structural calculation of rafters
Calculation of roof structures is carried out in accordance with SP 64.13330.2011 “Wooden structures”, but you can use tables with averaged data. This method is much simpler, although the result will slightly exceed the design minimum, since the tables are designed taking into account the maximum loads from snow and the weight of the roof. To determine the cross-section of the rafters, it is enough to know the span of the building and set the distance between the rafters.
Table: length and cross-sectional size of rafters depending on the distance between them
| Rafter length, m | Distance between rafters, cm | Rafter section size, cm |
| up to 3 | 120 | 8 x 10 |
| up to 3 | 180 | 9 x 10 |
| up to 4 | 100 | 8 x 16 |
| up to 4 | 140 | 8 x 18 |
| up to 4 | 180 | 9 x 18 |
| up to 6 | 100 | 8 x 20 |
| up to 6 | 140 | 10 x 20 |
When purchasing material, remember that the length of the rafters in this case is the size from support to support, that is, in fact, the rafters will be longer by the overhang of the roof eaves and trimming in the gable.
Sheathing design
The design of the lathing depends on the coating material:
- metal tile covering on the eaves and ridge of the roof requires a continuous flooring with a width of 450 mm, the pitch of the intermediate sheathing corresponds to the transverse profile of the corrugation and is prescribed by the material manufacturer;
- Roofing made of bituminous tiles (for example, “Shingles”), tiles, small slopes of roofing made of corrugated sheets (Euro slate Ondulin) require continuous flooring made of boards or moisture-resistant board materials (OSB, DSP).
The Code of Rules for Roofing (SNiP II-26–76) standardizes the minimum size of sheathing elements at 30x50 mm.
Execution of a set of drawings
The set of roof drawings includes:
- roof plan;
- installation diagrams of load-bearing elements;
- detail drawings of each structural element;
- attachment points;
- section of the roof with a flag showing the layer-by-layer composition of the roof;
- statements of material requirements;
- general data on drawings with installation instructions and material requirements.
The most commonly used sections of a timber rafter system
When calculating the distance between rafters, it is necessary to take into account the presence of vertical structures, for example, a chimney.
Without an engineering education, it is impossible to make drawings, so individual builders draw elements by hand or print out detailed components from technical literature and specialized Internet sites. However, the best solution is to order a roofing project from companies specializing in this type of work. This way, all requirements of current standards will be met, which guarantees the durability of the roof structure.
Video: designing a gable roof
Photo gallery: drawings of a gable roof
 The installation diagram of the rafters indicates all dimensions in horizontal projection
  The sections show the required dimensions, height marks, system elements and components are marked
  The design of the connection of elements has been worked out on the drawings of the units
  The assembly shows the required dimensions, layer-by-layer composition of the roof, and individual elements are marked.
  Based on the drawings, item-by-element statements are drawn up indicating quantity/volume/weight
Installation of a roofing system for a bathhouse
Let's look at the sequence of installing a roof for a bath using the example of a gable roof structure.
Required Tools
To build a roof you will need a set of measuring, cutting and carpentry tools:
- tape measures of different lengths from 5 to 20 meters;
- marker, pencil;
- cord along the length of the skate;
- claw hammer;
- metal scissors;
- roofing knife;
- spatula;
- scotch;
- hacksaw, electric saw, electric drill and screwdriver, various drills and attachments for them;
- horizontal and vertical level;
- rod, ruler;
- polyurethane foam and silicone sealant.
Tools must be kept in the tool bag while working on the roof.
For the safety of work it is necessary:
- safety belt, rope;
- safety glasses;
- mittens;
- set of workwear.
Step-by-step instructions for installing a gable roof
The installation of the roof begins when the attic floor beams are installed. Before starting work on the beams, running flooring is made from boards or slabs of chipboard, fiberboard, OSB, capable of withstanding the load from a person and the structure being mounted. All wooden roof structures are impregnated with a fire retardant, antiseptic and fungicide or a complex protection product against fire, rot and fungus.
All covering elements are prepared for installation on the ground using a template. The finished trusses are lifted to the installation site and temporarily secured with boards.
Installation work is performed in the following sequence:
- Installation of the support beam - Mauerlat. The Mauerlat, which ensures the stability of the roof and transfers the load from the roof to the walls of the house, is preferably made of dense hardwood that is resistant to rotting (oak, maple, larch). Minimum size timber 100x100 mm, most often a beam measuring 100x150 mm is used, placing it at least 5 cm from the outer edge of the wall. The beam is secured to the wall through a gasket of waterproofing material on the studs laid during the construction of the wall. The holes for the studs are placed evenly along the length of the beam, not aligned with the rafter attachment points. The holes for the studs are marked and drilled before the beam is lifted into the design position.
The Mauerlat is attached to the wall with evenly spaced studs, pre-embedded in the frame
- Assembly of the rafter system. It is easier to assemble a structure consisting of a pair of rafter legs and a tie on the ground using a template. In this case, all trusses will have identical dimensions. True, the weight of the structure can be significant, and a crane will be required for lifting.
Rafter trusses are easier to assemble on the ground and then lift to the roof
- Installation of roof trusses. First, the structures are installed at the ends of the house, temporarily securing them with mounting boards, racks and spacers. For ease of installation of subsequent elements in the ridge, a cord can be pulled between the installed trusses. Then intermediate trusses are installed. After all elements of the rafter system have been installed, they are finally secured at all points and temporary supports are removed.
To simplify the installation of intermediate trusses, a cord can be pulled between the outer rafters
- Installation of a superdiffusion membrane using a counter-lattice, installation of the main lathing. Using a counter-lattice, we attach a superdiffusion membrane to the rafters. Depending on the chosen covering material, we install the sheathing - sparse or slab flooring.
When installing a roofing pie, be sure to maintain a ventilated gap between the membrane and the roofing covering
- Covering installation. The coating material is laid from bottom to top from the left corner. The work is carried out according to the manufacturer's instructions. All necessary connections to vertical structures (for example, a chimney) are made. The roof ridge is covered with a special ridge element.
Sheets of metal tiles are attached to the sheathing with self-tapping screws with a neoprene gasket
- Installation of a drainage system (if provided for by the project). The drainage system protects the walls from excessive moisture. With a cornice height of up to 4 meters, its installation is not necessary, but the presence of a gutter and pipes will increase the service life of the building, and the costs will pay off handsomely. It is better to purchase a drainage system kit at the same time as purchasing the roofing material, matching the color of the roof or a contrasting color, depending on the taste of the owner. The drainage system includes:

- Installation of building gables, filing of cornices. In masonry buildings, the gables are usually made from wall material. In houses made of timber or logs, the gables are sewn up after installing the rafters, securing racks and purlins to the end pairs of trusses, along which they are covered with boards or metal profiles.
The gables of bathhouses are usually covered with siding or wooden lining along the sheathing, fixed to the end truss
Lastly, the cornices are hemmed and the soffits are installed in the eaves overhang.
Video: roof, attic and rough ceiling of the bathhouse
If you do not feel able to correctly calculate the rafter system, complete the drawings and build the roof, entrust this part of the work to professionals. If you decide to overcome difficulties on your own, remember that building a roof will take more than one week, because all work requires precision and consistency.
The final process of building a bathhouse box is covering the roof. After this, you can begin to decorate the bathhouse outside and inside, as well as purchase various equipment and accessories for relaxing in the bathhouse. In order for the bathhouse to last a long time, and for its ceiling not to leak during rain, it is necessary to properly install the roof, as well as provide it with good heat, steam and water insulation. Next, we will take a detailed look at the process of building a bathhouse roof with your own hands.
- Article
- Video
Before we move on to the technology of building a roof with our own hands, it is necessary to understand the elements of the roof frame, as well as the basic terms that roofers use.

The main purpose of the frame is to withstand its own weight, the weight of the roofing material, as well as the weight of snow, rain and auxiliary equipment (for example, a module or satellite dish). That is why the strength and stability of the frame are important indicators.
The roof frame of any building consists of a mauerlat, a truss, sheathing and roofing material.
It is called a wooden beam, designed to connect the base of the building box (body) with the roof frame. It is with the creation of the Mauerlat that the installation of the bathhouse roof frame begins. If the bathhouse is made from a log house, the topmost crown can serve as the mauerlat, but if the bathhouse is made of foam block or brick, the mauerlat is laid on the welded material. The Mauerlat is attached to the walls using long anchors. Before installing the Mauerlat on the walls of the building, it is necessary to cut special holes in it for fastening the rafter structure. The main requirement for installing the Mauerlat is its ideal horizontal position, because the quality of fastening of the roof frame to the body of the building will depend on this.
The next structural element of the roof frame is roof truss. The purpose of the truss is to distribute loads evenly across the entire roof. There are several forms of roof truss, we will talk about them a little later. A roof truss consists of wooden beams connected to each other. The main element of a roof truss is the rafters, to which the auxiliary elements are attached. As for the latter, these include crossbars, ties, spacers and lintels, the purpose of which is to strengthen the structure of the truss.

Frame sheathing the roof of the bathhouse is designed so that it can be carried out high-quality fastening roofing material to the rafters. The lathing is presented in the form of wooden blocks and boards fastened into a mesh. The number and size of the cells of this mesh are calculated based on what material the roof will be covered with. For example, to cover a roof with roofing felt, there should be no empty space at all (maximum 1-centimeter gaps), but in order to cover the roof of a bathhouse with corrugated sheeting, you can create a sheathing with cells 0.5 meters wide.

Roofing material The roof of the bathhouse is chosen according to the taste of the owner of the building. The most popular materials for roofing a bathhouse roof are corrugated sheets, metal tiles, slate and roofing felt. Each of the listed materials has its own installation features and requirements for the roof angle. For example, a roof with an angle of 5 degrees is covered with roofing felt, with corrugated sheeting - 8, with metal tiles - about 30, and with slate - 20.


Most often installation gable roof for a bathhouse is carried out if the owner plans to make an attic space in the bathhouse.
There are two ways to install rafters when creating a gable roof:

The design of a gable roof is more popular than a single-pitch roof, because... in this case, the angle of the roof will be sharper, which will prevent the formation of snow marks on the roofing material. A gable roof is a series of isosceles triangles identical in size and shape, installed in the same place along the entire roof. The top of the wooden triangle of their rafters is usually called the ridge, and the transverse wooden beam under the top of the triangle is called the crossbar. The crossbar is designed to strengthen the structure of a gable roof. The smaller the installation step of the trusses, the more stable the bathhouse roof structure will be. Please note that the trusses are assembled on the ground surface and then delivered to the roof. The trusses are attached to the body of the bathhouse after the ceiling beams are installed (can be done later). To make it easier to create identical wooden triangles, roofers use special blanks.
Installation of a gable roof is carried out as follows:
- The Mauerlat is attached to the wall of the bathhouse
- A roof truss is being created
- Two trusses are installed at different ends of the roof. To fasten the rafters to the mauerlat, screws of the capercaillie type are used.
- To ensure the stability of fixed trusses, the structures are additionally strengthened with special struts.
- A rope is stretched between the outer rafters at the level of the ridge, which will show the exact location of installation of the remaining trusses (so that the row runs smoothly, in one line)
- The remaining trusses are installed along the rope in the same way
Installing a pitched roof for a bathhouse is a less popular event, because... in this case, the angle of inclination of the roof will be flatter, which entails the formation of snow drifts on the roof of the bathhouse. Very often, under the weight of snow, roofs begin to deform and collapse.
You can see the design of a pitched roof in this project:


As you can see, rafter supports of different heights rest on the walls of the bathhouse and support the entire roof frame. The greater the difference in height between the supports, the steeper the angle of incidence of a pitched roof for a bathhouse. Please note that installing a flat roof will cost an order of magnitude less than installing a steeply sloping one.
As in the case of a gable roof, the frame of a shed roof for a bathhouse is attached to a mauerlat. Fastening should be done using metal corners, as well as copper wire. The installation step of the trusses should be about 0.6 meters. In order to protect the external walls of the bathhouse from rain, it is recommended to move the rafters outside the bathhouse box at a distance of 0.3 to 0.5 meters.
You can see more detailed technology for constructing a pitched and double-pitched bathhouse roof with your own hands in detailed video tutorials:
Technology of construction of a pitched roof
Construction of a gable roof of a bathhouse
Do-it-yourself installation of a sauna rafter system
After the bathhouse roof frame is installed, it is necessary to carry out hydro-, steam- and thermal insulation of the roof.
Measures for waterproofing, vapor barrier and insulation of the roof of the bathhouse
Steam and waterproofing of the roof


Initially, you should draw your attention to the fact that the roof frame should be made of well-dried lumber. In addition, wooden beams and boards must be opened manually, which will prevent rotting of the wood and increase its service life.
For steam and waterproofing the roof of a bathhouse, it is recommended to use roofing felt (for waterproofing), as well as a membrane film. Ruberoid is attached to the rafters in 2 layers, this will provide sufficient protection for the roof frame from precipitation.
As for the membrane film, it is a good thermal insulation and waterproofing material. In order for the film to function properly, it must be laid on the rafters and secured with construction tape. The membrane film strips should not be wider than 15 cm. Each new strip should overlap the previous one. We draw your attention to the fact that it is prohibited to stretch the film over the rafters; this can lead to its damage as a result of deformation of the lumber (expansion, contraction) during heating and cooling (in hot summer).
Bathhouse roof insulation


Speaking about insulating the roof of a bathhouse, you need to pay attention to several important nuances of this event:
- It is recommended to insulate the roof of the bathhouse with mineral wool. It does not burn, is durable and holds heat well.
- It is not recommended to use polystyrene foam to insulate the roof of a bathhouse with your own hands, because... This material releases harmful substances when heated. Did you like the article? Share the bookmark with friends, on social media. networks:
A gable roof with an attic is the optimal solution for creating a reliable structure in a bathhouse that meets all standards. It is functional and, with the right approach, can become a good decoration. But in order for the gable structure to meet all the assigned tasks, it is necessary to design it correctly.
Advantages of a roof with two slopes
In some cases, you can get by with installing a simpler roof with one slope. But if you think about it, financial expenses are not that different. Moreover, in terms of functionality, a gable roof has a number of advantages:
- the possibility of arranging a residential attic space or adapting it for bath accessories;
- high degree of thermal insulation of the bathhouse ceiling;
- with proper organization of the ramp, the structure will last as long as possible without repairs or additional maintenance;
- decent appearance.
A simple example of a gable roof: 1 – rafters; 2 – transverse fastening; 3– Mauerlat; 4 – ridge beam.
What will you need for your job?
You can construct a gable roof on a small bathhouse yourself, but first you need to decide on the materials. This is not only the wood used to assemble the frame, but also the coating responsible for the angle of inclination. For each type of material, its own indicators are recommended:
- ondulin – 3-15 degrees;
- metal tiles - 27 degrees;
- euroslate - 27 degrees;
- seam roofing – 18 degrees;
- roofing material - 5 degrees;
- corrugated sheeting – 8 degrees.

The indicators are dictated not by the decorative finish, but by the weight load on the roof frame. The heavier the material, the greater the angle of inclination is necessary. Gentle slopes may break under the influence of precipitation (snow) and the load exerted by the coating. In addition, the heavy structure will create additional load on the foundation of the bathhouse. This also needs to be taken into account.
When choosing a material and determining the angle of inclination, it is recommended to take into account the climatic conditions in the region. If precipitation is not intense, then the given indicators for each material can be changed.
In addition to the covering, the construction of a gable roof on a bathhouse and other structures requires lumber:
- embedded beam (mauerlat) is made of material with a cross-section of at least 150x150 mm;
- roof trusses are wooden beams 50x100 mm;
- Unedged boards are used as sheathing.
In addition, you will need a film to isolate the steam passing from the steam room and washing compartment and insulation.
Stages of gable roof assembly and rafter system
A roof in any structural plan is a frame sheathed with a roofing covering. All work is carried out in strict sequence.
First, the Mauerlat is installed. To do this, a 150x150 mm beam is laid along the top of the walls and attached to studs. They are built in in advance at the stage of laying bathhouse walls made of brick or other material. There is also the option of wire fixation. To do this, pieces of the required length are laid between the penultimate and last crown of logs, if the bathhouse is built from wood, or into brickwork. The Mauerlat must be laid evenly, both horizontally, and the diagonal of the structure must be checked.
 Grooves are cut into the mauerlat for laying the rafter legs at a certain distance. If wall panel thicker than the base of the roof, it is additionally wrapped in several layers of roofing felt and bricked on the outside to increase strength.
Next, you need to assemble the rafter structure. This is a rigid triangular beam made of timber. To further strengthen them, a spacer is mounted across each one. A crossbar is installed at the top of the corner. It is installed after the rafters are installed, and it is better to assemble them on the ground, having previously “removed” the dimensions.
When the required number of rafters has been collected, they need to be installed on the Mauerlat. The ridge corners are installed first. Trim and attach to the Mauerlat. Everything is ready. Of all the types of bathhouse roofs with two slopes, the process of installing the main rafters in this system is the simplest. At the end of the work, the evenness of both structures is checked. Next, the rope is pulled along the top of the corners and the remaining trusses are mounted relative to this landmark.
After installing all the rafters, we check the evenness of the installation and carry out a control fixation to the Mauerlat and the ridge strip. If the roof slope is more than 4.5 meters, then you need to additionally install supports so that one side holds the rafter leg and the other rests against the floor beam.
Finishing work according to plan
The roof skeleton has been assembled, all that remains is to carry out the final work. First of all, we determine the location of the chimney outlet if it is not laid through a wall. We mount a metal adapter and insulate it with insulation.

Next, using a stapler, we attach the vapor barrier layer to the rafters. On top of it we stuff a sheathing of unedged boards. The pitch is selected according to the type of roofing material. For roll coverings, continuous lining, for sheet materials You can fix the boards at a distance of 15–20 cm from each other. The lathing is stuffed over the entire rafter system, with a protrusion of about 20 cm beyond the lower edge. There is no need to do more, and if the trusses turn out to be longer, then they are sawed off at the same distance.
There is no need to rush to lay the coating. First, you need to give it additional strength by sewing up the end parts. For this you will need a board. IN brick baths, stone is laid out, with lining of the gables. If you plan to use the attic space, leave space for installation window frame.
When the structure is sewn from the gables, it will be much stronger. Now you can proceed to the next stage. Waterproofing is laid over the sheathing. In some cases, the membrane used for these purposes is laid between the rafters, under the counter-batten. This allows you to create an additional air layer for quick drying of the roof structure and additional ventilation of the bathhouse ceiling from the attic space.

Laying roofing material
Most last stage gable roof assembly. The installation principle is the same for all types of coatings. You need to start from the bottom of the cornice and gradually rise, covering the lower rows with the next layers. Make sure the installation is even so that the appearance is not spoiled by crooked lines. Having closed both slopes, we install the ridge strip, securing it with self-tapping screws.
The gable roof assembly process is complete. This is the simplest option for designing a rafter system. By taking the advice into account, you can independently design a reliable roof for your bathhouse that meets all technological requirements.
As a rule, a personal bathhouse in a suburban area is not large in size, so the roof for it does not have the most complex design. However, despite its apparent simplicity, this design must still be reliable and durable. In addition, we do not forget about the planned functionality of the attic space - it may not be used at all, considered only as a utility room, for example, for storing bath utensils and brooms, or the owners plan to create a completely suitable one there, where they can fully relax.
Therefore, before deciding how to make a roof for a bathhouse, you need to choose its design. Of course, this is done at the stage of drawing up a construction project. Well, then - you can move on to the final calculations, and then – directly to the installation work.
Types of roofs for baths
There are quite a lot of roof designs, but to cover a bathhouse, gable and single-pitched options are most often used, less often - a broken mansard type of rafter system. To figure out which design is more suitable for a particular case, it is necessary to consider their general characteristics.
Gable roofs
The most popular design for covering bathhouses is the gable roof option, as it has many distinct advantages. Gable systems can be created with a “habitable” attic space or simply with a cold attic, depending on the wishes of the owner of the building. It is worth dwelling on which option is more profitable.

- The roof, under which the attic space is provided, can be called a more advantageous design option for the following reasons:
— Living space can be equipped in the under-roof space. If a bathhouse is being built in a country house, then a residential house and a bathhouse can be placed in one building - a bathhouse and a bathroom on the first floor, and rest rooms on the second floor.
- If country house has already been built, then in the attic of the bathhouse you can make a room for winter storage of various garden tools and other items necessary for summer recreation and work on the site.
- If the bathhouse is used in winter, the attic will become additional air insulating layer, retaining heat inside bath rooms.
— The presence of an equipped attic requires the location of the roof slopes at a large angle, so that snow masses will not linger on the roof surface.
— Any roofing material can be laid on steep slopes, since there is virtually no risk of such a structure leaking.
The disadvantages include the fact that such a project is somewhat more difficult to implement, but not so significantly. Of course, more materials will be needed. Wind loads on the roof will play a significantly larger role. If it is decided to build a veranda next to the bathhouse, then, most likely, one of the slopes will have to be made broken in order to switch to this extension with a smaller roof steepness angle.

- A gable roof without an attic is usually chosen in three cases:
— If such a design is predetermined by the chosen architectural style of the building.
— If you plan to place a veranda or terrace under one of the slopes, in addition to the bathhouse itself, and at the same time leave the slope even from the ridge to the eaves, without a break.
— If you plan to place a solar water heating system on the roof —
If we talk about this design, then its characteristics will be directly opposite to the previous version:
— If a bathhouse is built in a region with snowy winters, then the resulting snowdrifts will linger on the slopes located at a slight angle.
— For such a roof with pronouncedly small slope angles, there are already quite serious restrictions on the choice of roofing covering. For example, it is not recommended to use soft tiles as roofing material. Its pronounced rough surface will help retain moisture and wind-blown dirt, which becomes prerequisite for the appearance of moss colonies, and this will sooner or later lead to leaks. There may be problems with other coatings - each of them has its own limits of use on slopes of low steepness.
— Under a low roof it is impossible to arrange either a residential or a normal utility room. At best, you can only put away small garden tools.
— If leaks occur, it will be much more difficult to detect the exact location of damage to the roofing material.
— When using a bathhouse in winter, heat will leave the premises much faster through the ceiling, even if it is insulated, since the “cold” attic cannot take any part in the overall thermal insulation system.
If you plan to use the bathhouse only in the warm season, then a low roof is also suitable for it. However, it is necessary to provide a reliable rafter system, since under the pressure of large masses of snow its elements may not withstand the load.
Shed roof
A pitched roof has the simplest design, so its rafter system is easy to install. Mainly due to the fact that you don’t have to equip its ridge area - the rafters usually rest on opposite walls of different heights.

The features of this design include the following:
— The absence of a warm attic will require effective thermal insulation of the ceiling if the bathhouse will be used year-round.
— It is convenient to install on a pitched roof solar collector or a tank for natural heating of water.
So, if the bathhouse is small in size, and the owners do not have any special need for an attic space, then a pitched roof may well become the best option.
Prices for fastenings for rafters
fastenings for rafters
Broken mansard roof
A mansard roof is usually made if it is planned to place both a bathhouse and the living quarters of the cottage in one building. This option is certainly more complicated in calculations and practical implementation, but in the end it helps to save a lot of money.

It is clear that the attic necessarily needs effective thermal insulation. Moreover this is important even if the cottage is considered only for summer use. Otherwise, in the summer it will be unbearably hot in the upper part of the house, and there can be no talk of any comfort in living on the attic floor.
The attic roof has the most complex design of all the rafter systems listed above. And yet, very often it can be called the best option, since this approach allows you to save not only money, but also save more free space on the site.
Any roofing material can be used for an attic rafter system, since snow can only linger on its upper part, which has a small slope area. Still, it is best to place them at an angle of at least 20÷25 degrees.
Of course, no one bothers to build a more complex roof system over the bathhouse - hip, half-hip, hipped. But in this case, this is rather an excess, which, however, can be justified by the general design style of this country “estate”.
What needs to be taken into account when designing a rafter system?
Despite the fact that There are several suitable designs for the roof of a bathhouse, the most popular of which is the gable version. Therefore, using this design as an example, it is worth considering those design features that must be taken into account when calculating the rafter system.

If you choose a gable roof, then you need to know that there are two options for its arrangement - systems with layered and hanging rafters. The choice of one of them depends on the presence of capital partitions inside the structure. If they are present in the project, then a layered version of the rafter system is selected. However, given that the structure of the bathhouse usually has quite compact dimensions, a hanging wall can be used to cover it. truss structure, in which the main load from its weight of the entire system falls on the external main walls of the building.
The rafters in a bathhouse built from timber or logs are secured to the top row of trim. If the walls are raised from bricks or blocks, then a wooden beam - a mauerlat - is fixed along the upper end of the walls on which the rafters will rest.

Due to the fact that In addition to the weight of the roof covering with sheathing, other, more serious loads will also fall on the rafter legs; before ordering or making them yourself, it is necessary to make some calculations of their parameters. And to do this, you first need to decide on the slope of the roof slopes. A lot depends on this parameter - the length of future rafter legs, the loads falling on the roof, and the type of roof covering.
It is quite obvious that the angle of inclination of the slopes directly depends on the height of the ridge line, if we assume that the width of the building along the gable wall is known. To make it easier to determine this parameter, you can use the proposed calculator.